
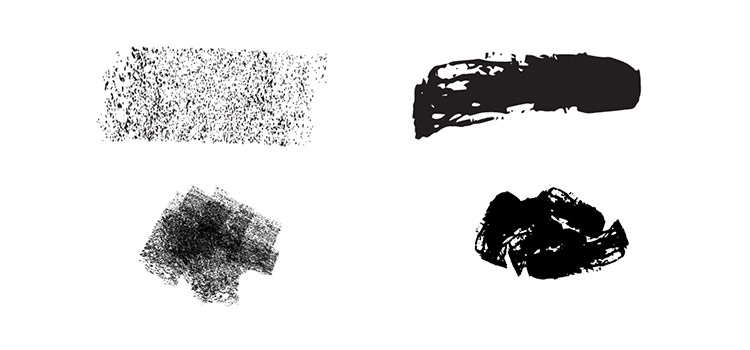
I’ve only recently started incorporating Illustrator texture brushes into my work, and I regret not doing it sooner! Illustrator texture brushes offer so much hand made feel with such little effort, you almost feel like a magician 😉 To get started, all you need is any kind of vector texture like this set of inky brush strokes or these mini grit textures (both free!). From there, we convert them into Illustrator art brushes with specific settings and we’re done! This will be such a great addition to your regular workflow if you love including extra texture into your work. For the tutorial, we’ll create some inky and gritty typographic drop shadows in just a few quick minutes. Read on to see it all!
How to Create Illustrator Texture Brushes
Mentioned in the video:
The colors mentioned in the video were:
- RGB
- Blue: 1/162/166
- Teal: 41/217/194
- Lime Green: 189/242/113
- CMYK
- Blue: 79/15/37/0
- Teal: 62/0/35/0
- Lime Green: 28/0/72/0
Final Outcome:


When you create your own Illustrator texture brushes, here are a few tips to keep in mind:
- Skinny, vertical or horizontal textures are best suited for texture brushes.
- With your vector texture selected, convert it to a compound path (object > compound path > make) and then open your pathfinder palette (window > pathfinder) and hit the unite icon. This will keep any overlaps you create with your texture brush correct-looking. Below, on the left is what will happen if you skip this step, the right shows what we want to happen 🙂

- With your texture selected, open your brushes palette (window > brushes). Hit the icon at the bottom of the palette for ‘new brush’. Select ‘Art Brush’ from the dialog box that appears.
- Apply any specific settings you desire, and apply a colorization of ‘tint’ if you’d like your texture to take on the color of your stroke.
- Use the brush tool to create a path that you’ll apply your texture brush to! Change textures by selecting your path, then clicking on the texture brush in the brushes palette.
- Reduce the size the texture appears on your path by utilizing the stroke palette.
- To save your brushes, hit the icon in upper right corner of your brushes palette and choose ‘save brush library’. Here’s a video if needed 🙂
Receive special offers on courses + products, a new design file every month plus instant access to the Resource Library!

Pick up over 50 design + lettering files as our gift to you when you join the Tuesday Tribe for free!
error
Congrats!
Please check your email to confirm.
You May Also Enjoy
 Create a Gritty Photoshop Texture Brush Posted in Tutorials, Photoshop, Textures, Beginner
 Save Time Using an iPad with Illustrator Posted in Tutorials, Illustrator, Hand Drawn
 Freebie: 8 Seamless Ink Texture Patterns Posted in Freebies, Textures, vector
 Create Watercolor Texture Brushes in Adobe Illustrator Posted in Tutorials, Illustrator, Textures, Beginner
Macee Jo | September 26, 2016
|
Tuesdays are my favorite days because I look forward to your tutorials! Thank you so much, I’ve been wondering how to do this! Also, do you have any tips for how you store all of your graphics and how you organize your files? Do you use a USB drive or anything like that? Thanks!
Teela | Author | September 28, 2016
|
Aww thanks so much Macee Jo! Means a lot to hear that 🙂 How I keep my resources organized is having a folder called ‘assets’ on my desktop and within that folder I’ll have other folders like ‘textures’, ‘mockups’, ‘photos’, ‘brushes’, etc. and then I’ll place the actual files in there. I’ve been keeping that system for years and I’m always able to find what I need really quickly. For actual files I keep, I have a folder on my desktop called ‘artwork 2016’ and within there, I’ll have a folder for each month, titled in the ‘o1, 02, 03’ format. Within the month folder, I’ll put my actual files. I hope that helps!