
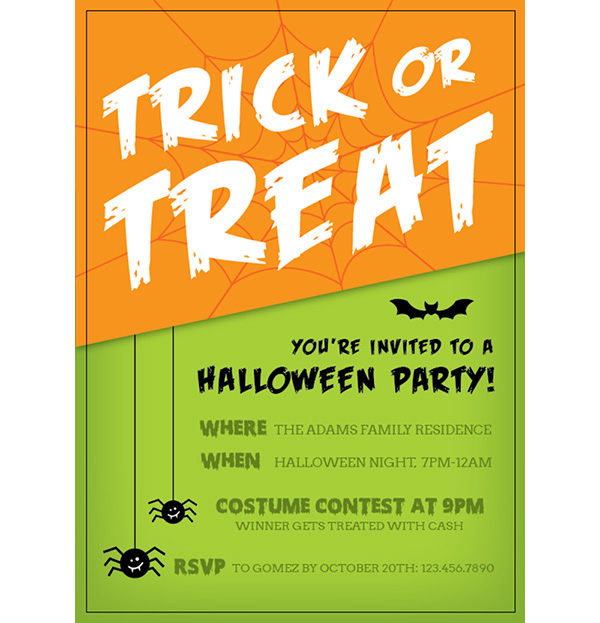
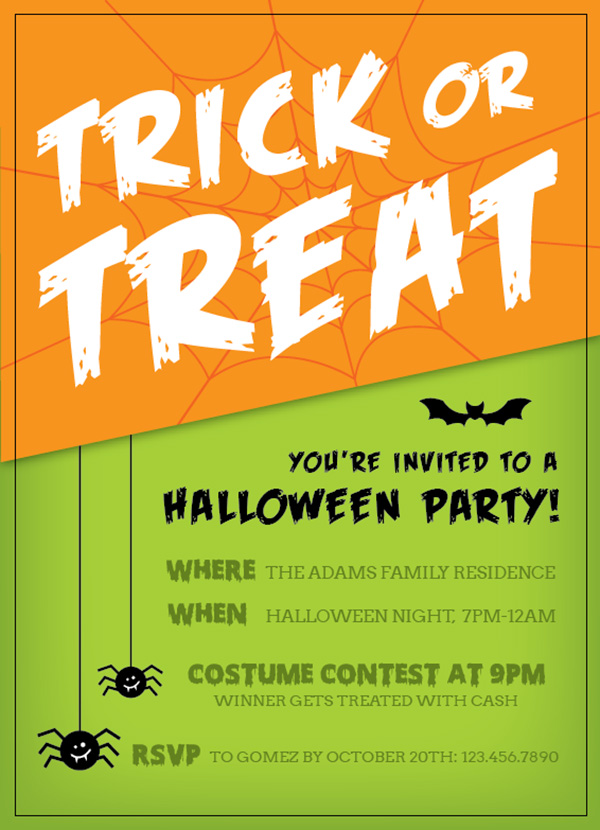
With Halloween quickly approaching (and lots of holiday themed parties), I thought it’d be the perfect time to create a tutorial on designing a print ready Halloween invitation. For this invitation, I’m using the bat, spiderweb, and spider from the free Halloween vectors pack I created, so make sure to pick them up here. When the invitation is finished, we’ll have a 5″x7″ print ready CMYK 300dpi invitation with .125″ bleeds on all sides. Let’s get started!
What we’ll create:
Step 1
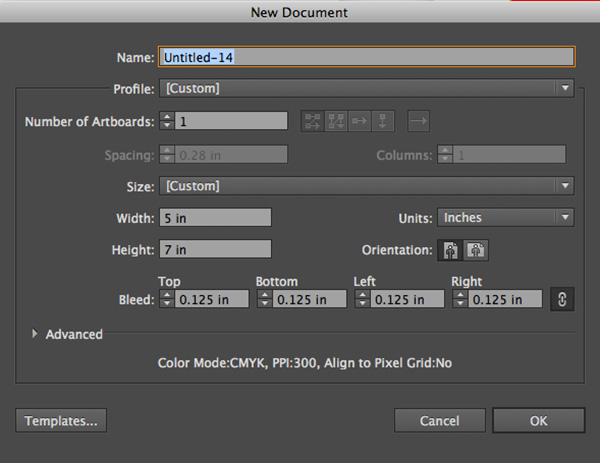
Create the new document by going to File > New and inputting the following dimensions. Note that there is a .125″ bleed on all sides.
Step 2
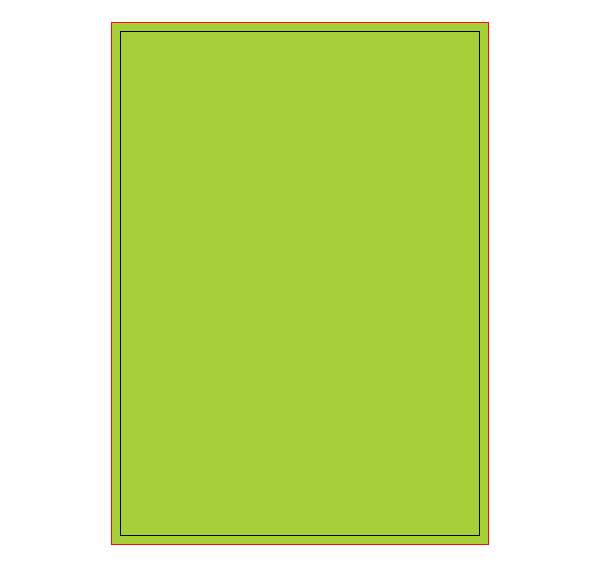
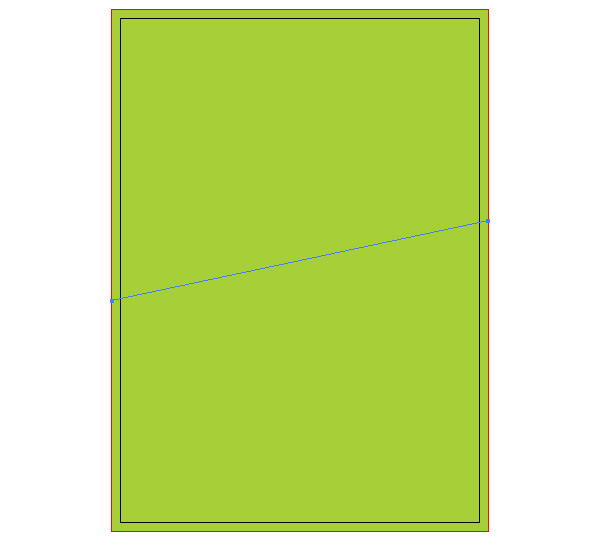
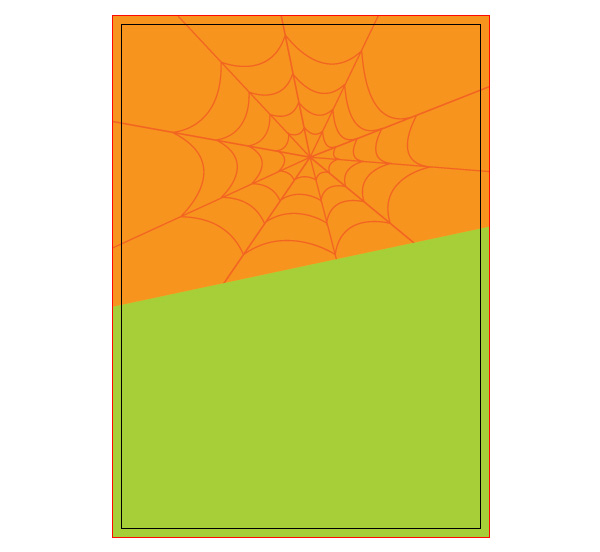
Grab your rectangle tool, set the fill in your color panel to C=40 M=0 Y=100 K=0 and draw a rectangle to fill the entire artboard.
Step 3
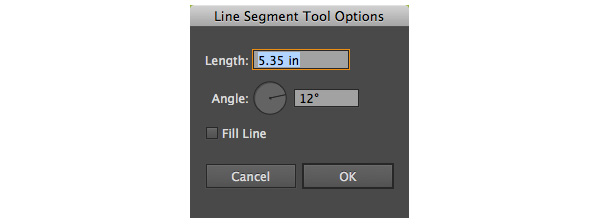
In your layers panel, lock the layer you’re currently working in and double click to name it “background green”. Next, click on the create new layer icon right next to the trash can in the same panel. Now, grab the line tool (keyboard shortcut “\”) and double click. Input 5.35″ at an angle of 12 degrees. Position the line just above halfway from the top of the artboard.
Step 4
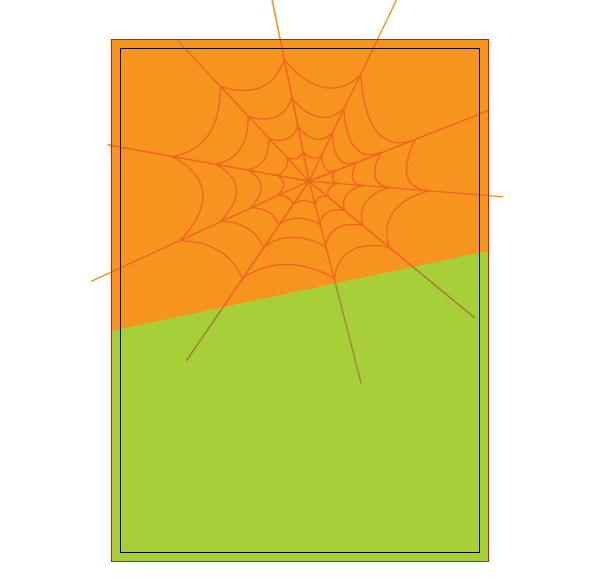
Now grab your pen tool (keyboard shortcut “p”) and hover over the right node until you see something like this: “\” appear. Click on the node, then hold shift and click on the upper right red corner, then the left corner (all while holding shift), and finally close the shape by clicking on the left node of the line we drew in step 3. In your color panel, apply an orange fill to this shape: C=0 M=50 Y=100 K=0

Step 5
Next, select the orange shape you just made and copy it (cmnd + c on a mac, ctrl + c on a pc) and paste in front (cmnd + f on a mac and ctrl + f on a pc). Now, copy any spiderweb from the spiderwebs vectors freebie and paste it on your invitation. Using your selection tool, scale it up so it fills the entire inside of the orange. Change the color fill to the same orange we used earlier, and in the transparency panel, set it to ‘multiply’.

Step 6
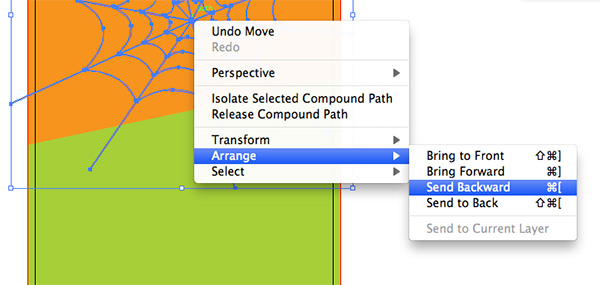
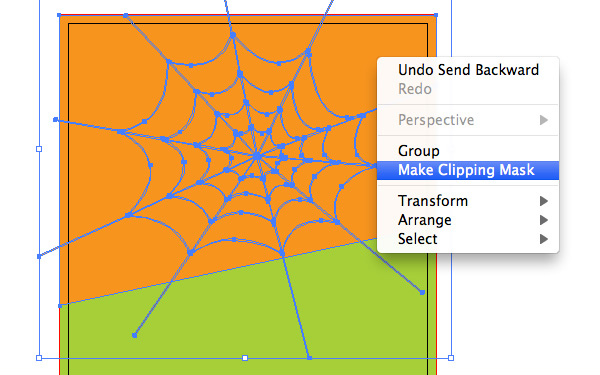
Select the orange spiderweb and right click, then choose Arrange > Send Backward. With it still selected, hold shift and click on the orange shape we made earlier. Next, right click and choose Make Clipping Mask. Now your spiderweb is perfectly cropped in the shape.
Step 7
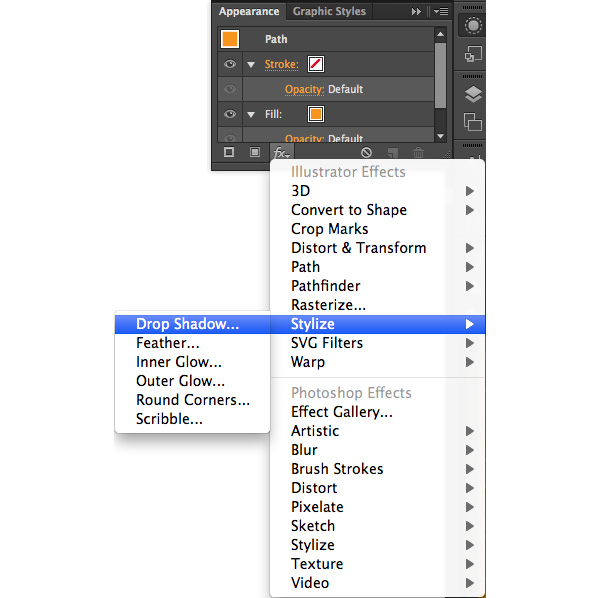
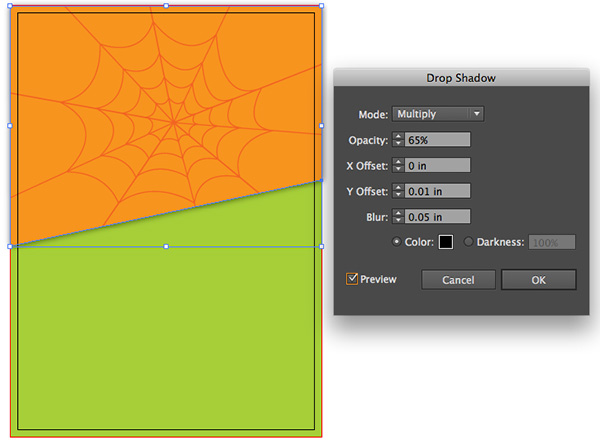
Now we need to apply a drop shadow to the orange shape, not the clipping mask that we just made. Since our orange shape is right below our clipping mask, we can select the clipping mask, then right click and go Select > Next Object Below to select our orange shape. Once selected, go to your appearance panel (Window > Appearance). Click on the fx button on the bottom, then Stylize > Drop Shadow. Input the values below, and hit ok.
Step 8
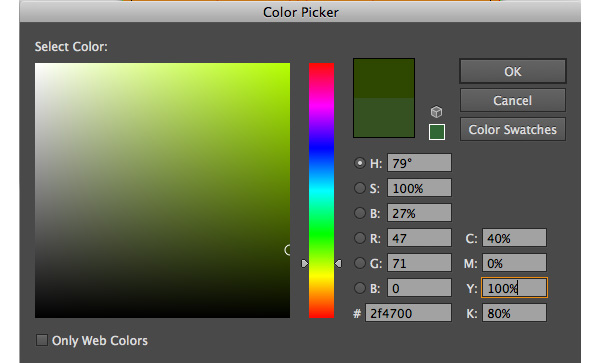
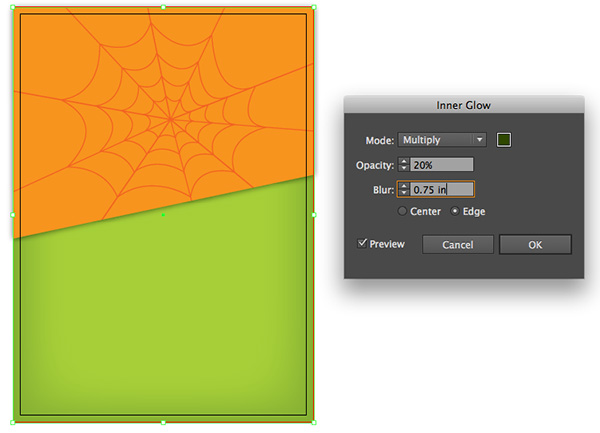
Next, let’s add an inner shadow to our green background color. We’ll have to revisit our layers panel and unlock it first. Once unlocked, select the green shape and go to the appearance panel once again. Click on the fx button and go to Stylize > Inner Glow. Change the mode to Multiply and click on the color thumbnail. Input the dark green value: C=40 M=0 Y=100 K=80. Set the opacity to 20% and the blur to .75″, then hit ok. Return to your layers panel and lock the layer. Click on the layer we’ve been working on to continue the design.
Step 9
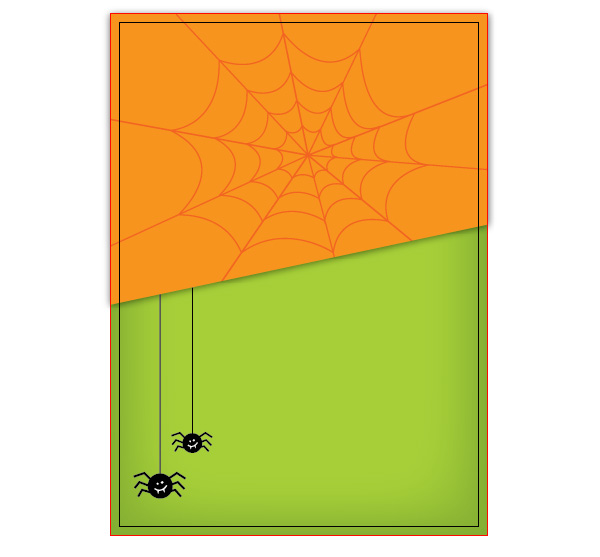
Now it’s time for us to add our spiders. Copy and paste them into the document from the free Halloween vectors file. Place the first spider in the bottom left corner. Since it’s grouped with part of its web, grab the direct select tool (keyboard shortcut ‘a’) and click on the top of the web then drag, extending it all the way to the orange. Do the same with the other spider, placing it just a little higher up than the first. Once both are positioned, select both spiders then right click and select Arrange > Send to Back. This will place them behind the orange’s drop shadow we created earlier.

Step 10
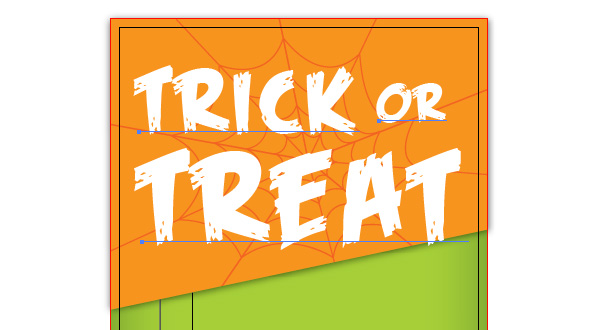
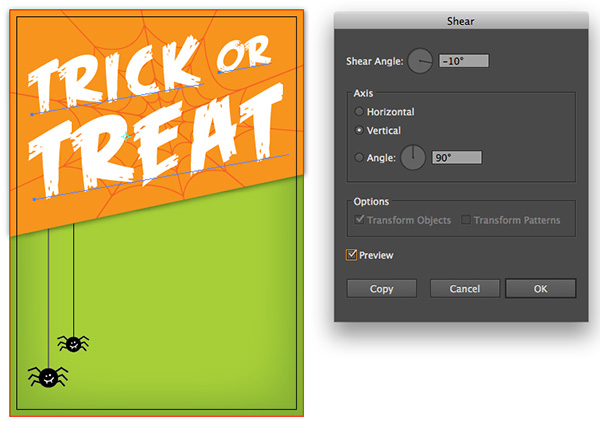
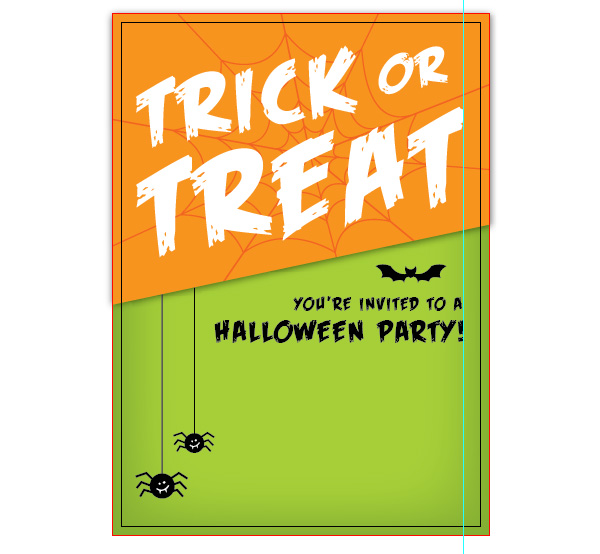
Now it’s time for us to add our text! Let’s start with the headline, “Trick or Treat”. First you’ll have to install the free font Feast of Flesh which you can download here. Next, type out Trick or Treat and set similar to below with a fill of white. I typed out each word separately, then rescaled until I was happy. All three words have a tracking set at 100, with ‘Trick’ having a point size of 92, ‘or’ having a point size of 55, and ‘Treat’ having a point size of 130. Once you have your text stacked, select all the words, then double click on the shear tool in your tool box. Input a shear angle of -10 degrees, and under axis, make sure ‘vertical’ is selected. Position the headline over the spiderweb.
Step 11
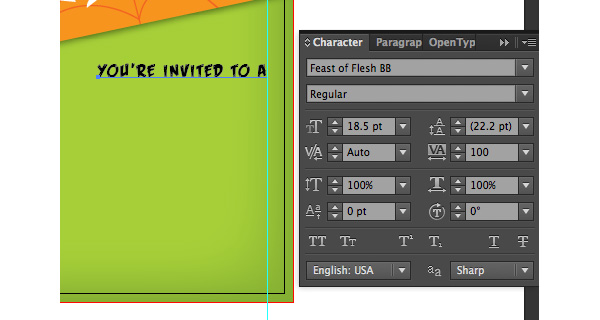
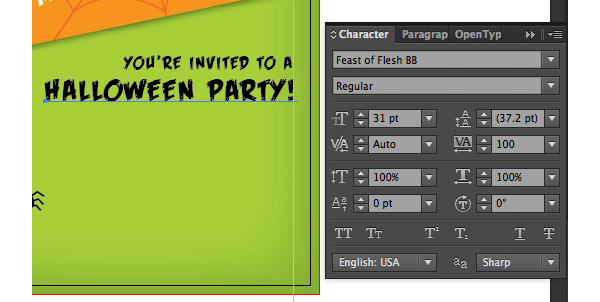
Using the same font, let’s set our headline, “You’re invited to a Halloween Party!”. First type “You’re invited to a” with a black fill, set at 18.5 pts with tracking set at 100. I’ve also set a guide pulling from my rulers (to turn on rulers: keyboard shortcut cmnd + r on a mac and ctrl + r on a pc) that is set at 4.75″. I’ve right aligned my text to that guide. Next, type out “Halloween Party!”. Make sure it has a black fill and set the text at 31 pts with tracking set to 100. Right align to the guide.
Step 12
Time to add our little bat! Copy and paste one of the bat silhouettes from the free Halloween vectors file and set its fill to 100% black. Position it right above “You’re invited to a”.
Step 13
Finally, we need to add the details to our party. For all of the main lines (i.e. WHAT, WHERE, etc.) download the free font, Scary Halloween from here. Set those main lines to have a color fill of C=40 M=0 Y=100 K=45. Each main line is set to 16pts with a tracking of 0. For all of your detail lines that follow your main ones, download the free font, Arvo from here. Set the same color fill as the main lines, in all caps, with a font size of 11 pts and tracking of 0. For the smaller, RSVP info, set to 10pts.

Step 14
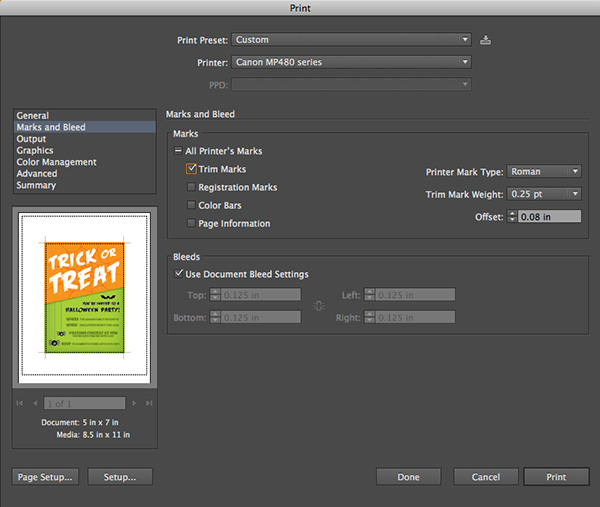
If you’re printing these from a home computer, you’ll want to print them with trim marks so you can cut perfectly with your bleed. Go to File > Print and click on Marks and Bleed on the left hand side menu. Under Marks, check the Trim Marks box. Under Bleeds, check Use Document Bleed Settings then print!
Congrats! You’re Done!
Thanks for reading + Happy Halloween!
Receive special offers on courses + products, a new design file every month plus instant access to the Resource Library!

Pick up over 50 design + lettering files as our gift to you when you join the Tuesday Tribe for free!
error
Congrats!
Please check your email to confirm.
You May Also Enjoy
 How to Create a Retro Type Invitation Postcard in Illustrator Posted in Tutorials
 How to Create a Wedding Invitation in Illustrator Posted in Tutorials
 How to Create a Retro Style Graduation Announcement in Adobe Illustrator Posted in Tutorials
 How to Create a Flat Frankenstein in Illustrator Posted in Tutorials, Holiday, Illustrator, Illustration
No comments