
One of my favorite typography books is Shadow Type by Steven Heller + Louise Fili. I’ve broken the hardcover spine with all of the times I’ve paged through, sticky noted the tops of others and left it flat open, absorbing as much as possible. What’s most impressive is the consistency and creativity with all of that 3D type, perfectly executed by hand. I’m constantly reminded of how lucky we are to have a program like Adobe Illustrator, making things in seconds that once took hours. One shadow type project I’ve been working to perfect is dimensional signage typography. I love how the typography looks 3D and oftentimes has a long shadow, extending in the opposite direction. In this week’s tutorial, I’m sharing my method of creating that signage typography look using Illustrator!
Pin it for later!
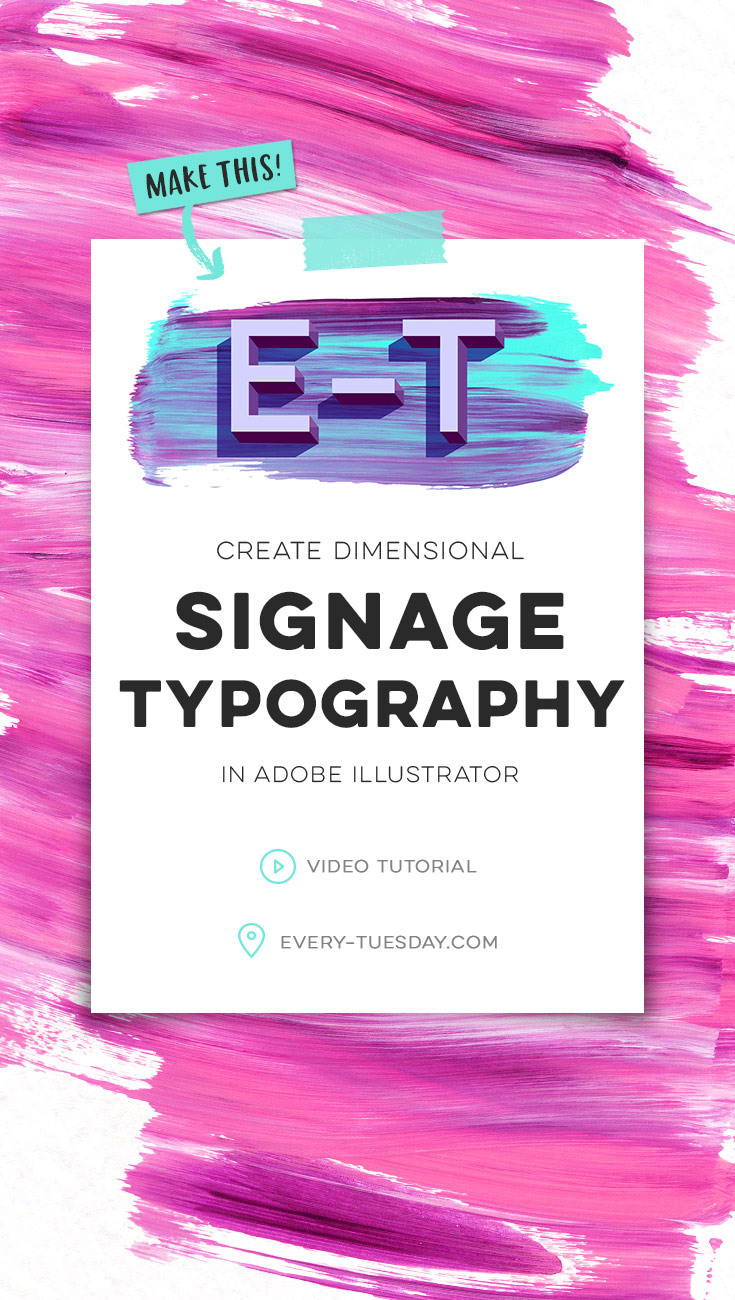
Create Dimensional Signage Typography in Adobe Illustrator
Mentioned in the video:
- Mega Paint Streak Pack (streak no.17 used)
- Novecento Sans Wide (normal weight used)
Colors used
If placing on white (RGB):
- Text color: 194/184/222
- 3D color: 141/86/163
- 3D dark details color: 71/0/72
- Shadow: 227/229/227
If placing on the no.17 texture:
- Text color: 212/210/255
- 3D color: 141/86/163
- 3D dark details color: 71/0/72
- Shadow (apply multiply blend mode): 148/118/199

Here’s a written overview of what we did in the video!
- Type your letters – if it’s your first time, choose letters without curves first, since it becomes far more complex when they’re introduced.
- With your text selected, type > create outlines. Create a copy at an angle to begin creating the depth of your letters. Duplicate the top copy for later use.
- Use your blend tool with ‘specified steps’ selected and use a large number (I used 75). Create a blend from one of the top copies to the copy at an angle. Object > expand, then hit the ‘unite’ icon in the pathfinder palette to finish the smooth transition from the top copy to the angled one.
- Create another copy of the top text and place it where the angled copy was placed earlier. Create an additional copy at an angle opposite the 3D portion of your letter (this is for your shadow). Repeat the same steps from earlier: blend, object > expand, unite. Send this copy to the back and color as desired.
- Using the pen tool, add shaded areas based on where your light source is coming from. Turn on your smart guides (view > smart guides) to make the process easier by ‘snapping’ to anchor points.
- If placing a texture behind your text, change the shadow’s blend mode to ‘multiply’ in the transparency palette (window > transparency).
- Done!
Receive special offers on courses + products, a new design file every month plus instant access to the Resource Library!

Pick up over 50 design + lettering files as our gift to you when you join the Tuesday Tribe for free!
error
Congrats!
Please check your email to confirm.
You May Also Enjoy
 How to Create 3D Typography from Scratch, Part 2 Posted in Tutorials, Typography, Photoshop, Textures
 How to Create 3D Typography from Scratch, Part 1 Posted in Tutorials, Typography, Illustrator
 How to Create a Layered Letter Effect Posted in Tutorials, Typography, Photoshop, Illustrator, Textures
 How to use Text in Procreate Posted in Tutorials, Typography, Hand Lettering, iPad Lettering
Marie | August 7, 2018
|
can you do a tutorial like this using curved letters. I find doing shadows with 3D letters so hard!