
Before we hit the end of the year, I was brainstorming ideas for winter themed illustrations, and mittens seemed perfect. I love how easy they are to make your own: design/decoration, shape and color! In this beginner-friendly (but some prior knowledge will be helpful) tutorial, we create a pair of cute winter mittens in Adobe Illustrator. Follow exactly or edit them to make em your own! Illustrator CC is recommended since we make use of some new features to speed up the workflow, but the result is still achievable in older versions. Read on to see how!
Pin it for later!
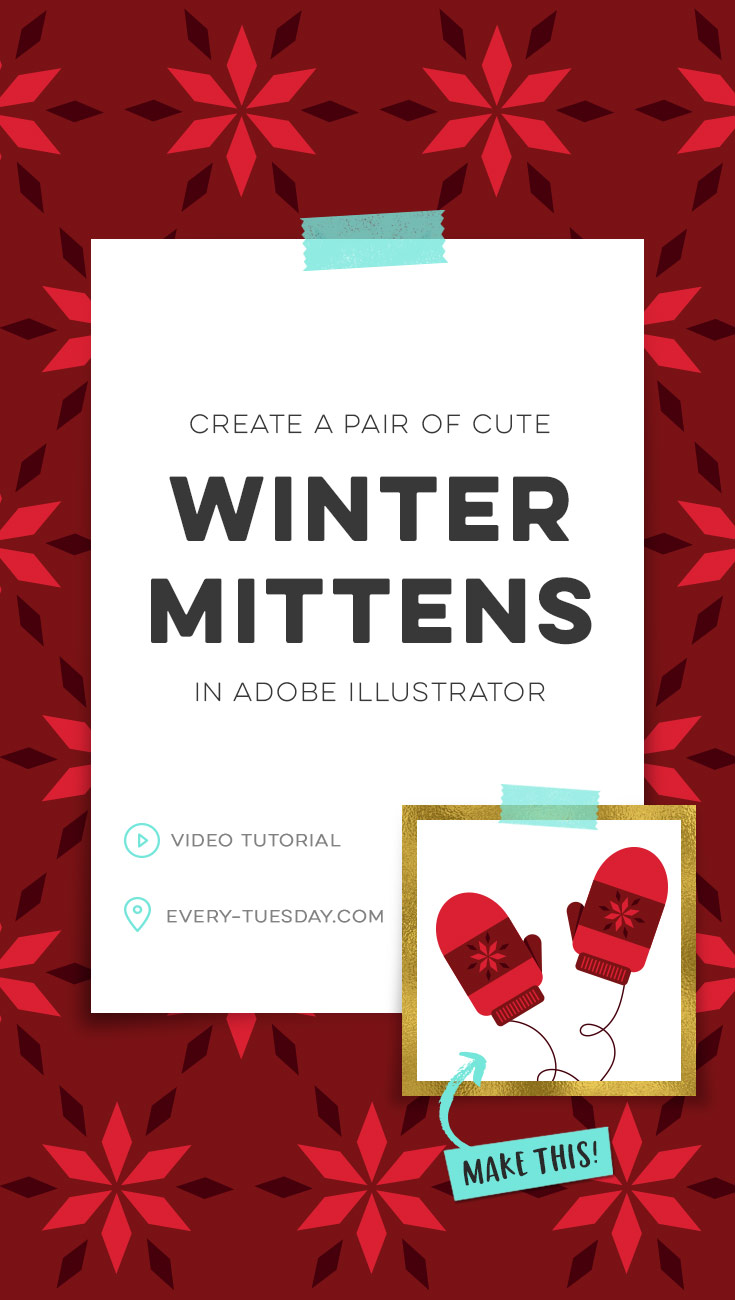
Create a Pair of Cute Winter Mittens in Illustrator
Mentioned in this video
Colors used in this video (CMYK)
- Light/bright red: 10/100/90/0
- Medium red: 30/100/100/40
- Dark red: 40/100/80/70

Here’s a quick overview of everything we did:
- Use the rounded rectangle to create the base of your mitten.
- Grab your ellipse tool and pull an ellipse to overlap your rounded rectangle. Adjust as needed and use the pathfinder palette to merge the two shapes together.
- Add a ‘thumb’ using the rounded rectangle tool; send it to the back. Create a shape over it for the shadow, narrow at the base of the thumb and growing slightly outwards as it goes upwards. Use the shape builder tool to remove extra shadow pieces and create a seamless fit over the thumb. Send to back, but keep above the base thumb shape.
- Use your rectangle tool to place a rectangle in the center of the mitten to house your design.
- Reference this tutorial if needed for extra clarity on the snowflake/star design. Create your initial diamond using the star tool reduced to four points, then scaled. Take one diamond, rotated in position and create a similar rotation around to create an outward feeling. Color the exterior diamonds dark red and keep the main star/snowflake shape white.
- Create the base of the mitten using a rounded rectangle. Create a skinny rectangle on top and use the blend tool to make multiples, simulating (simplified) raised stitching.
- Group all mitten elements together. Rotate the mitten slightly and duplicate and reflect the copy.
- Use the pencil tool to draw the string connecting the mittens together. Adjust stroke weight as needed.
- Group all elements together. Expand all elements if resizing is needed later on (to maintain proportions). Done!
Receive special offers on courses + products, a new design file every month plus instant access to the Resource Library!

Pick up over 50 design + lettering files as our gift to you when you join the Tuesday Tribe for free!
error
Congrats!
Please check your email to confirm.
You May Also Enjoy
 Cheers! Create Flat Style Cocktail Glasses in Adobe Illustrator Posted in Tutorials, Holiday, Illustrator, Illustration, vector
 Create Geometric Snowflakes in Adobe Illustrator Posted in Tutorials, Holiday, Illustrator, vector
 Create a Flat iMac Icon in Adobe Illustrator Posted in Tutorials, Illustrator, vector
 Create Seamless Pattern Wreaths in Adobe Illustrator Posted in Tutorials, Holiday, Illustrator, Patterns, vector
Queenie | December 21, 2017
|
Thank you for the tutorial.
Luisa | December 27, 2017
|
Thank you for the great tutorial! I had a lot of fun drawing these mittens, and the results are lovely!
Happy holidays!
Bèr | February 12, 2018
|
Thanks for the tutorial. My first steps in illustrator.