
One question I’m often asked is how to avoid blurry edges in Procreate. Rather than a standard written post, I think it’ll be better and clearer to show it in a vid. In this week’s tutorial, I’ll explain exactly what you need to know to avoid blurry edges, why they happen and what you can do to avoid them from ever happening. Read on for all the details!
Pin it for later!
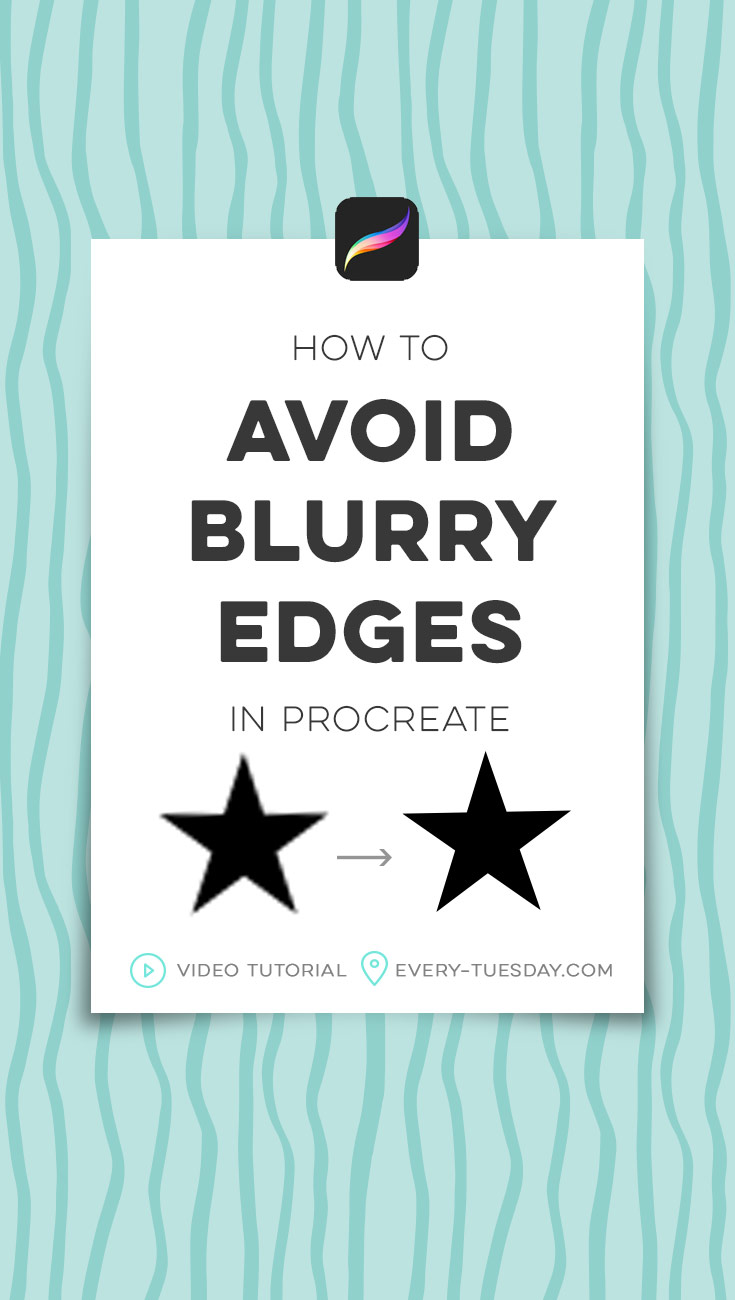
Quick Tip: How to Avoid Blurry Edges in Procreate
Mentioned in this video:
- Pick up the free monoweight Procreate brush (along with others!) in my Resource Library
- Check out my metallic procreate texture kit here
- My watercolor procreate texture kit is available here
The fonts used in the slides are Miss Magnolia and Eveleth (clean thin)
Looking for other Procreate tutorials? View them all here or check out my YouTube playlist.

Here’s the written version of how to avoid blurry edges in Procreate:
- Like Photoshop, Procreate is a pixel, or raster-based software. Blurry edges occur when an element is created in a pixel-based program at a smaller size than it is used at. When it’s scaled up, the pixels are stretched, resulting in blurry edges.
- Side note: software (like Adobe Illustrator) that is point, or vector-based, allows seamless rescaling of elements. In a vector based program, you can reduce or enlarge an element as much as you’d like without any appearance issues. This is not the case with pixel based programs.
- There are two major things you can do to avoid blurry edges in Procreate:
- 1. Create your artwork at the largest it’ll ever be used at from the beginning. If it’s always the largest you’ll need it at, you won’t ever have to scale it up. You can always scale artwork down; compacting pixels won’t ever result in blurry edges the way that scaling up does.
- 2. If you create the artwork at a smaller size and scale it up, you can use the scaled up version as a template to recreate the artwork at the larger size. The scaled up blurry version won’t ever be corrected in a raster/pixel-based environment; if you need the larger size, you must recreate the artwork to crisp up those edges.
One more thing:
Not only does this rule apply to the artwork you create in Procreate, it also applies to any textures or graphics you bring into Procreate. If you grab a texture, for example, the size the texture was created at will need to be used at that size or smaller in order to retain its best appearance. (this is why my metallic and watercolor procreate texture kits were all created at 2500px by 2500px – so large they cover all common uses.)
Receive special offers on courses + products, a new design file every month plus instant access to the Resource Library!

Pick up over 50 design + lettering files as our gift to you when you join the Tuesday Tribe for free!
error
Congrats!
Please check your email to confirm.
You May Also Enjoy
 Create Easy Ribbons in Procreate Posted in Tutorials, Hand Lettering, iPad Lettering, Beginner
 Create a Paper Cut Out Effect in Procreate Posted in Tutorials, Typography, Hand Lettering, iPad Lettering, Advanced, Procreate
 How to Make Animated Gifs in Procreate Posted in Tutorials, Hand Lettering, iPad Lettering, Beginner, Advanced, Procreate
 iPad Lettering: Masking in Procreate Posted in Tutorials, iPad Lettering, Advanced
Debbie | May 23, 2019
|
Thank you, Teela! This was very helpful, and love that you included a “trick” to avoid the pixelation when you enlarge the image,. Nice!