One of my favorite uses for the hand lettering I create is vectorizing it and using it digitally. When it’s digital, you don’t just have one copy anymore; you have unlimited copies. Unlimited copies leaves the door to digital and physical prints massively wide open. By taking a few simple steps, you can quickly digitize your lettering, clean it up in Illustrator and create a print ready file in a matter of minutes. Like I said, one of my favorite things 🙂 This week, I share my full process on how I do it by creating a hand lettered birthday card in Illustrator!
Create a Hand Lettered Birthday Card in Illustrator
Mentioned in the tutorial:
– Scanner Pro app
– Rustic Greeting Card Mockups
CMYK color palette used in the video:
- Lime green: 15/0/50/0
- Teal: 51/0/40/0
- Blue: 61/3/0/51
- Grey: 22/12/0/79
- Pink: 0/80/40/0
Final Outcome:
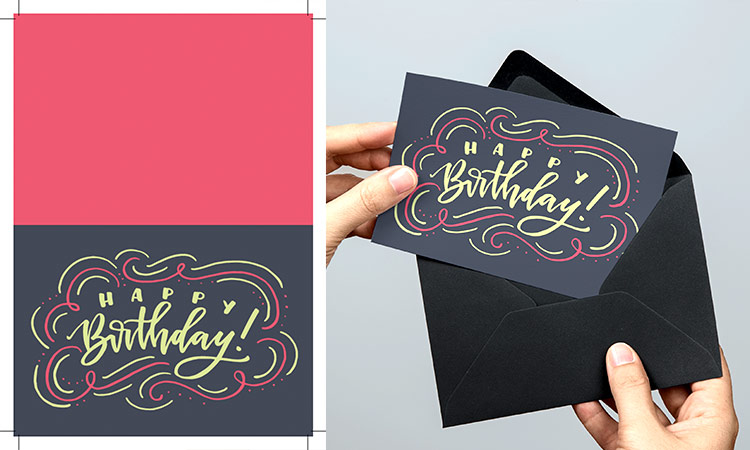

We went over a bunch of things in a short amount of time! The next time you’re vectorizing your lettering to be print ready, here are a few tips to keep handy:
- Contrast is key when you’re bringing in opaque (non-watercolor or semi-transparent) lettering. Use rich blacks as often as possible. Here’s the brush pen that created the artwork seen in the video.
- If you don’t have a scanner, but you have a smart phone, use the Scanner Pro app – I can’t tell you how much I’ve used it, and I have a scanner! SUCH a time saver!
- Create your Illustrator document and file > place your artwork in.
- If you’re not happy with your live trace settings, you can always tweak them as shown in the video. Increasing your ‘threshold’ and ‘paths’ settings will make for a more exact image, but it creates additional anchor points, which makes for larger file sizes.
- If you choose not to live trace, be sure you’re comfortable with the pen tool before you dive in too deep. Using the pen tool can get frustrating and overwhelming fast if you’re unsure of how it works. If you opt to use the pen tool, lock your image on the layer below your ‘trace’ layer and use it as a guide. I like reducing the opacity settings of my base as well, so I can clearly see the new artwork I’m creating on top.
- To keep it looking even more handmade, use a pencil tool to smooth edges (your artwork must be selected first!).
- You can also use the delete anchor point tool (keyboard shortcut ‘-‘) to remove extraneous points, and use your direct select tool (keyboard shortcut ‘a’) for adjusting handles.
Receive special offers on courses + products, a new design file every month plus instant access to the Resource Library!

Pick up over 50 design + lettering files as our gift to you when you join the Tuesday Tribe for free!
error
Congrats!
Please check your email to confirm.


Diane + Dean DIY | September 27, 2016
|
Thank you, Teela. Your tutorials are all so valuable so thank you for taking the time to create them. Is there any other way to vectorize than paying for illustrator? I do not have it. Do you know of any apps for the iPad Pro that vectorize?
Teela | Author | September 28, 2016
|
Hey! I’m not sure about apps for the iPad, but you could try inkscape on a desktop – I haven’t tried it, but it’s the (free) Illustrator equivalent, so I would think that’d be your best shot.
Marie | September 27, 2016
|
Hi Teela!
I love this tutorial!! I can’t wait to do this. A couple of questions though. If you wanted to sell the card online, would you use the PDF with the crop marks?
Also, can you explain the Image Trace options of Method -> Create Fills/Strokes? And why would you not use Ignore White? I ran into problems of trying to get rid of the fills inside some lettering (the bowl of the A or O for instance) I don’t know if I did your method wrong but I just couldn’t get rid of it as easily as you did. Or maybe I just didn’t do it right o_O
Thanks!
Teela | Author | September 28, 2016
|
Hey Marie!
Yes, you’d want to deliver it with the trim marks so the recipient could trim it to size without any funky white edges (you could always offer both options if you’d like, but keeping the trim marks on there is the more ‘professional’ delivery). So the reason I *don’t* check the box for ‘ignore white’ is because, even though it gets rid of the white, it’ll oftentimes leave empty shapes (i.e. shapes with no fill or stroke) and when you go to edit edges of your letters, illustrator gets confused if you’re editing that empty shape or an actual, filled letter that may be below it. Such a headache. By using the magic wand tool and doing it manually (seen in the vid), it not only removes the white, but any paths associated with those white areas, too, which makes the file so much easier to clean up. I hope that helps!
Allyson | September 27, 2016
|
Holy cow! I’ve been using illustrator for about 7 years and went to school for graphic design… how did I not know about the pencil tool?! I have always just used the direct selection tool. Thank you so much for this! Love that there is always something new to learn in these programs.
Teela | Author | September 28, 2016
|
Game changer, right?! The direct select is awesome for precision, but holy moly does it take FOREVER! Thanks for checking out the vid!
Natalie | September 27, 2016
|
Love this tutorial. I love watching people work, and getting inspired to try something new in my normal practice – thank you!
– Natalie
http://www.workovereasy.com
Teela | Author | September 28, 2016
|
Thanks so much for checking it out!
MonicaB | September 27, 2016
|
Great tutorial! I can not wait to try the scanner app.
Teela | Author | September 28, 2016
|
You’ll love it! Thanks so much for checking out the vid!
heidi | September 27, 2016
|
– hi.. thanks for the great Illustrator tutorial, you are always so clear and concise. I’m looking forward to creating a birthday card for a friend.
Teela | Author | September 28, 2016
|
Thanks, Heidi! I’m so glad it was helpful 🙂
Sue | September 28, 2016
|
Thanks Teela – it’s great to see how other designers work. This might be a simple card but it seems I always learn at least one new method by watching your video. Can’t wait till next Tuesday!
Mari | September 28, 2016
|
I love your every Tuesday videos! Always so creative and with clear instructions! I never knew about being able to move the anchor bar without moving the other anchors around it. So insightful! I will also have to try the pencil tool! I have always just used the smooth tool! Keep the vids coming!
Teela | Author | September 29, 2016
|
Thanks so much for checking it out, Mari! So glad it was helpful 🙂