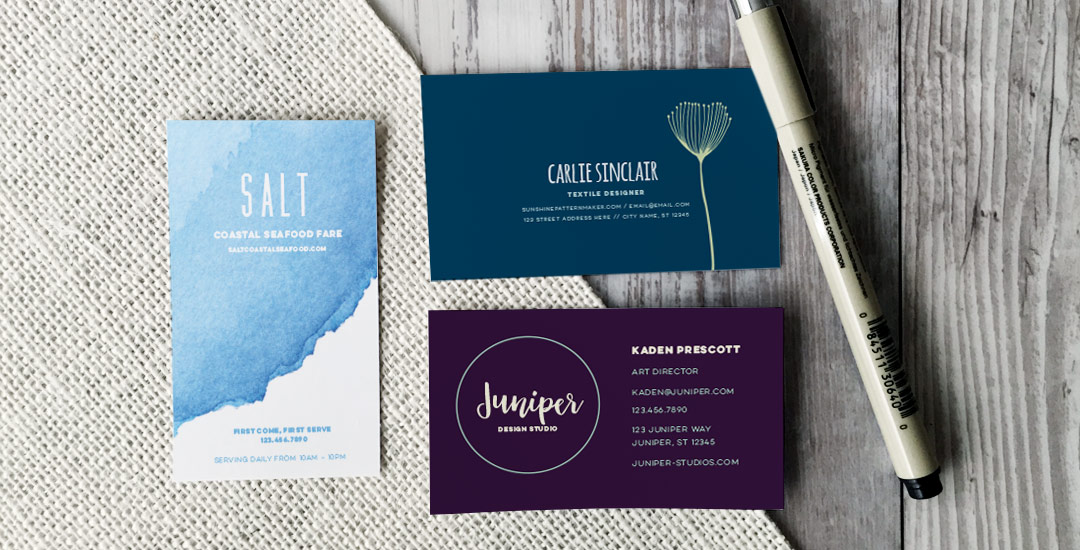
HomePosts Tagged "design" (Page 29)

design Tag

Happy Tuesday! I’ve gotten quite a few requests lately on layout design for a business card, so this week I wanted to share some design friendly layouts that could be used for different types of businesses, and also make each one print-ready using Illustrator. At the end of this tutorial, you’ll have 3 business card design layouts (front and back!) you can print at home using the bulk print method, or send off to a professional printer. Read on to see how – links to the fonts and resources used included below!

Happy Tuesday! This week’s tutorial comes courtesy of Brittany, who shared this photo with me, which I agreed would make a great quick tip tutorial! As a bonus, I’m sharing how to create multi-colored long shadow typography, in case you’d like to use more than one color for your shadows 🙂 We’ll create every version quickly in Illustrator using one simple tool and a couple of extra time saving options. This is perfect for gig posters, MTV-esque retro designs, greeting cards, or paired with simple icons. Read on to see it all!

With the launch of my recent Skillshare class, Metallic Magic, and the Glitz + Glam Digital Foil and Glitter Kit, I wanted to dedicate a post to some inspiration on how you can use your new digital foil and glitter making skills. While I had a blast creating those sparkly textures, I’ve had even more fun applying them to designs, hand lettering, stamp effects and more. Today I want to share some digital foil and glitter inspiration to get you excited about all the opportunities out there to get your logos noticed, enhance your portfolio, make your website shine, etc. Have a look below and get ready to take your designs further 😉

Happy December! I’m not sure how we got here so quickly, but here we are! In the spirit of the upcoming holidays, I’m excited to say the next few weeks will all be holiday-specific tutorials. This week we’re going to start things off with a typography tutorial (my favorite kind) requested by Allison on how to form typography into a shape. To start the holiday theme off, I’ll share how I would create typography to conform to the shape of a holiday bulb using the word ‘Joyful’. Read on to see it all!

I pulled some pretty long hours getting the Glitz + Glam Kit ready for the holidays because I knew it was exactly what I needed this year to push my designs further…plus, who doesn’t like a little extra sparkle + shine in their work ? 🙂 This week – whether you’ve picked up the kit yet or not (here’s the freebie texture from last week you can use!), we’ll create a holiday wreath in Photoshop with foil accents. We’ll go over creating and applying a custom brush to a path, adding a foil texture to it and even changing the color of the foil! I also share how I set up my Instagram files in Photoshop 🙂 Read on to see it all!

Today is a big Tuesday! I just went live with my newest kit, Glitz + Glam, Digital Hot Foil and Glitter Textures, AND I’m giving one of those textures away for free in this post! I’ve gotten a few questions on how I apply gold textures to some of my Instagram images, so with the release of the kit, the free texture, and the holidays coming up, I wanted to share how to create hot foil typography using Photoshop and Illustrator this week. This week’s freebie comes as a seamless pattern file, high res tileable jpg and layer style. Read on for the freebie, tutorial, and more info on the kit!

Happy Tuesday! This week’s tutorial comes to you courtesy of Lauren, who emailed me last week asking how to create a realistic paper cut out effect. With winter well on its way (my family in upstate NY has already had their first snowfall!), I thought a winter theme would work well with the effect. Do you remember these free hand drawn vector snowflakes from wayyy back? I thought it would be a good time to bring them back for this week’s tutorial and pair them with a more intricate snowflake to really show off the handmade look of this effect. I also happen to have a digital recycled paper pack and handmade paper pack which I thought would bring some nice authenticity to finish off the whole piece (pick up some free ones here). Read on to create your own!

Happy Friday! I’m so excited to announce the conclusion of the Font Project this week! It’s been a great 6 weeks learning how to really take a font from some doodled letters on paper, to typing on screen. I know I still have a ways to go with learning the ins and outs of Glyphs Mini (as with any kind of software), but it’s a challenge I’m looking forward to take on. I have a few final tips I wanted to share from this week’s work, and I also want to announce that my new font has a name and it’s available for download! Read on for it all!

A while back, I shared how to create dimensional typography in Illustrator, which is perfect for artwork that needs to be rescaled to different dimensions. But what if you already know the biggest your type needs to be seen at and you’d like to use Photoshop instead? In this week’s tutorial, I share how to create that dimensional typography quickly and easily in Photoshop using the rectangular marquee + pen tool to create selections and a soft brush to create those dimensional shadows. And! Since it’s Thanksgiving month and all, we’ll finish everything off with a small fall detail 🍃 😉Feel free to use these ideas for Thanksgiving invitations or greeting cards! Let’s get started!

Happy Friday and welcome to Week 5 of the Every-Tuesday Font Project! I can’t believe next week is our last week! This past week was such a HUGE week of learning for me. Taking your letters from Illustrator and putting them into Glyphs Mini is definitely not as simple as copy/paste – but it isn’t hard, I promise! Just a *little* tedious. You shall see 😉 Below I have a full video on how I set up Glyphs Mini and how I set up my Illustrator file to bring everything in at the right sizes and finished the video off with kerning in Glyphs Mini and exporting the font, then typing with it in Illustrator. As tedious as this week was with a learning curve and just the steps in general, it was so incredibly satisfying. Read on to see these letters become a font!

GDPR Icon

Your Privacy Matters

We use cookies to customize and create content that’s most important to you. We’ll never share the info we collect.

View Privacy Policy