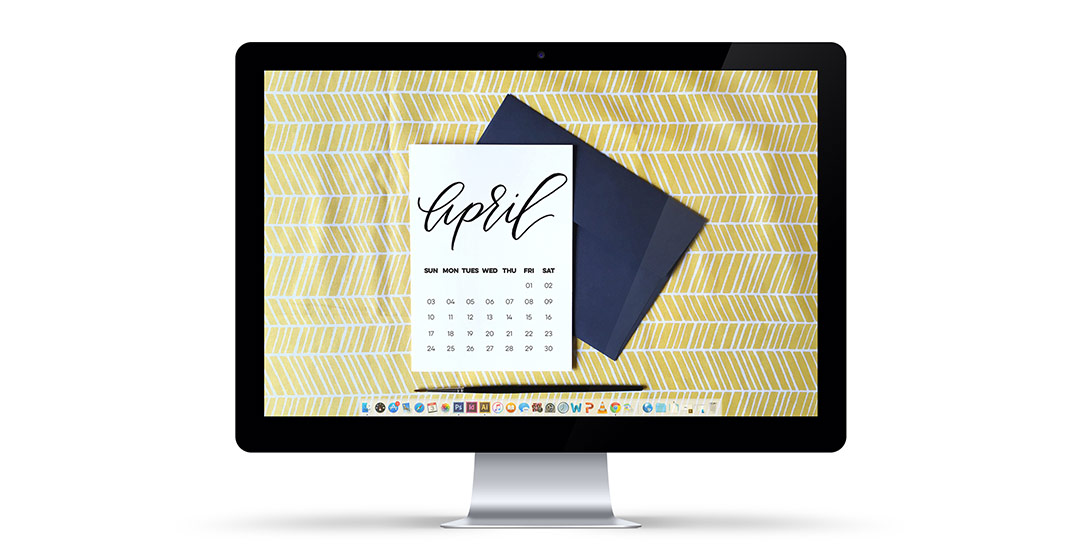
March 2016

Happy April tomorrow!

Everything felt very non-stop sprint throughout all of March. Most of it was due to my ocd with getting the ebook as perfect as possible. If I didn’t become a designer, I would have been a writer, so I naturally spend more time than I probably should carefully crafting sentences and evaluating word choices. But! It’s finally out into the world and I’ve returned to breathing once again 🙂 (I made a free preview of the book available yesterday! If you’re interested, click here to download it!)

I’m really looking forward to diving back into design tutorials this coming month. It seems like I’ve been away from them longer than 4 weeks and I’ve missed putting them together. Lately, I’ve been doing a lot of prep on an upcoming Intro to Photoshop class. This will be the best quality course I’ve ever done (a real production team-quality!) and it’s hard to keep in the excitement for it, but I’ll have many more details as the month goes on 🙂 I’m also planning my next Skillshare class this month, so if you’re on the every-tuesday email list, keep an eye out because free spots to the class will be heading your way soon!

Until then, pick up your free April 2016 desktop wallpaper to keep things on track in two common formats: 1920×1080 + 1280×1024 both with and without dates. Download link + previews below!

Welcome to the 3rd and final part of the Every-Tuesday Tips + Advice Portfolio Series! Over the last couple of weeks, we went over choosing the right work for your portfolio, what to include for each project and how to order all of your projects together. Now that you have a solid body of work to show, it can be overwhelming figuring out how to get it all noticed.

In this week’s video, I take you through a few easy steps to get you on your way, as well as sharing how I got my own work noticed when I was just starting out. For a more in depth look and actionable step-by-steps, check out Full Time Graphic Design where my ebook on getting a job just launched! Part 3 video below!

Today is a pretty gigantic day over here at every-tuesday. After 6 months in the making (and an entire last week on very little sleep), I’m excited to announce the Full Time Graphic Design ebook is finally available! This was a big project – the ebook itself is 74 pages long, and there are countless bonuses (even one including a full portfolio review + evaluation by me personally!).

What started as a basic guide evolved into a deep dive with little clips of my own experiences, from being hired – and hiring – and super specific tips (like the exact days and times which are best to send a cold email). Once I got going, I couldn’t stop myself from thinking of more and more little nuggets I had to include 🙂 Check out all the details here, and a full outline below!

Things have changed quite a bit in the last 5 years. Back then, it was perfectly acceptable to attach a pdf (which you had a zillion different variations of) to an email, but that just isn’t the case anymore. Pdf portfolios are a dated way of portfolio delivery on top of taking up valuable space in a potential employer’s inbox. Enter the digital portfolio age where having an online digital portfolio presence is essential for a graphic designer. Luckily, you don’t have to be a programmer or a super nerd to get your work online and looking fine 😉

This week, I’m rounding up options to get your portfolio up as quickly as possible, looking as professional as possible, and collecting some nice SEO in the process. All of the options – free and for a fee – available below!

Welcome to week 2 of the Every-Tuesday graphic design portfolio tips + advice series! Last week, we went over how to select the right projects to include in your portfolio based on your personal skillset strengths. This week, we’ll go over proper formatting for your projects, how many projects to include in your portfolio and what order to put them in to leave a memorable impression on an interviewer. These tips will contribute to graphic design portfolio best practices that you’ll be able to apply to your portfolio – no matter how much it changes – over the course of your career.

The Full Time Graphic Design ebook is less than a week away from being available! You’ll want to pick up your free portfolio project checklist to accompany this week’s video here and you’ll automatically be put on a list to be notified when the ebook (packed with tips + advice for getting a full time graphic design job) goes live 🙂

If you had a chance to check out my graphic design story, you heard me mention that I wasn’t asked for my resume in past interviews. I want to clear something up though; that doesn’t mean I didn’t have one ready in case I was asked.

As a creative, a resume takes a big back seat to your actual portfolio, but every interviewer is different, and you want to make sure you’re always prepared, just in case. Because a resume falls so secondary during an interview, I would recommend spending as much time on your portfolio as possible and keeping your resume simple, clean, readable and to the point. This week, I’m rounding up 5 of my favorite *affordable* clean and creative resume templates that provide a terrific base for you to adjust and customize without starting from scratch (time much better spent on your portfolio). See them all below!

Last week, I mentioned a new portfolio tips + advice series starting today and leading up to an ebook being released later this month called Full Time Graphic Design. In this week’s video, we’ll walk through how to pick out the right design projects to put in your portfolio and craft it in a way that highlights your strengths as a designer and sets you up for an interview with intention, rather than a general collection of work that spans every discipline of graphic design. Choosing the right work for your portfolio will play a pivotal role in not only reaching out to potential employers to land an interview, but for the interview itself. Watch below to see all of my tips!

In Tuesday’s video, I shared my graphic design story and today I wanted to share what my current design workspace looks like, as well as some of my favorite desk items that I use every week, if not every day. I’ve definitely gone through my fair share of printers, tablets and computers, so listed below, you’ll find names and links to all of my top picks and why I chose and use what I do 🙂 I hope this helps anyone who may be on the fence with anything desk-related (I did a lot of thorough research before I started adding to cart, so I know how helpful a user review can be). I’m an open book, so if you have any questions about anything listed, feel free to ask!

If you’re an every-tuesday email subscriber, you’re already aware my ebook on tips and advice for obtaining a full time graphic design job will become officially available later this month. In preparation of its launch, I wanted to dedicate this month’s Tuesdays to sharing portfolio tips I’ve learned from my own experiences in a free portfolio tips video series. The first video will be next Tuesday’s post, but this week, I wanted to start things off by sharing my own graphic design story.

I’ve had a few comments and emails asking how I got started, how I knew graphic design was the right major for me, and what I would tell people who might be on the fence about a career in graphic design (and if jobs are available for graphic designers) today. I sat down in front of my computer in a very non-typical/non-screen-only recording this week to answer all of those, so it could be like we were sitting down together, just having a conversation as friends. So here it is, from beginning to now, along with some tips I picked up on the way 🙂

My newest Skillshare class, Watercolor Textures for Graphic Design, went live on Monday, and I’m so excited to share that nearly 1,000 wonderful creatives have already enrolled in the class! Creating watercolor textures from scratch – the act of sitting with a brush in hand, swirling colors together in unique ways – is one of my favorite times to relax and kind of let the art be made without thinking too hard. It’s definitely easy to lose track of time once you get started, but also awesome to then have so many cool new textures to work with. If you’re ever short on ideas on how you can start using those newly created textures, today I’m rounding up a bunch of inspiration with ways to start applying your watercolor textures in graphic design. Read on to see them all!

Happy Tuesday! This week I’m excited to announce my newest Skillshare class, Watercolor Textures for Graphic Design. If you’ve ever wondered how watercolor textures like this and this are created, color enhanced and removed from their backgrounds, this class covers it all! We even finish the class creating seamless, repeatable watercolor texture patterns you’ll be able to apply to any of your Photoshop designs in just a couple of clicks 🙂 As a special gift to blog readers and youtube subscribers, this week I’m sharing the class trailer, as well as one of the videos from the class you wouldn’t otherwise get to see without enrolling. If you’ve never tried Skillshare before, you can watch the full class for free (and any other Skillshare classes for an entire month) using this link. Hope to see you in the class!

GDPR Icon

Your Privacy Matters

We use cookies to customize and create content that’s most important to you. We’ll never share the info we collect.

View Privacy Policy