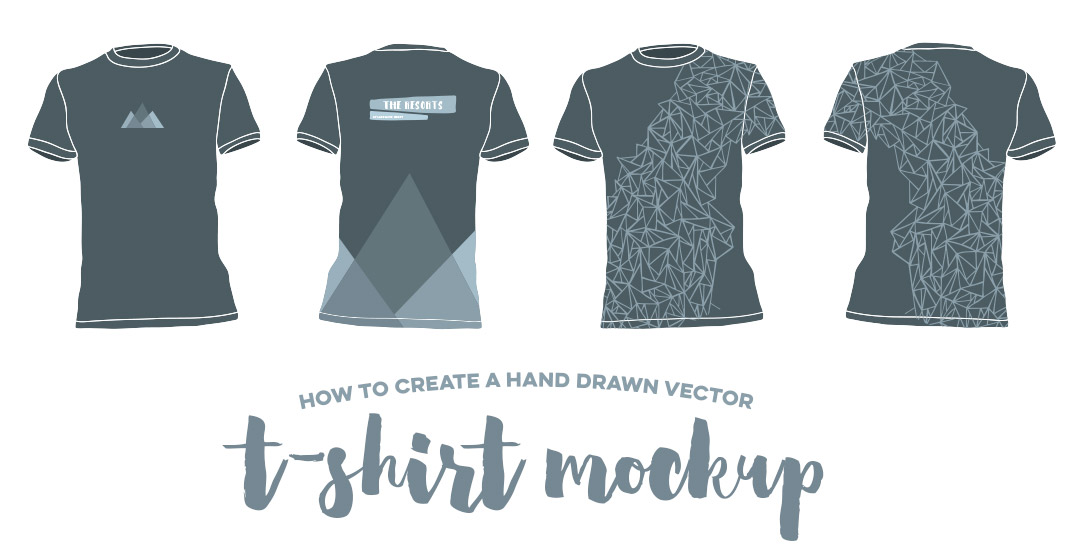
HomePosts Tagged "how to" (Page 27)

how to Tag

We may not be fashion designers, but that doesn’t mean there isn’t a place for graphic designers with apparel design. At some point in time, the majority of graphic designers have to mock up some kind of apparel to get quoted and executed by a manufacturer. It’s no surprise why – as branding experts, we need to be able to carry a brand through a variety of applications, and especially at events, apparel is key.

I’m currently working on some clothing designs for a company that will be at the 2016 Rio Summer Olympics. They’re in the process of finding a manufacturer for their clothing and had asked for mockups to present to potential manufacturers to get accurate quotes. They sent a few pictures of styles of clothing they were interested in, all at different sizes and resolutions. To keep the focus on the design of the clothing and keep everything similar, I redrew the clothing in Illustrator, then implemented the vector graphics on top.  Having redrawn it in illustrator, all the clothing was kept consistent look-wise and the manufacturers were quickly able to see which panels would be printed with design or kept the base color. In this week’s tutorial, I’ll share my exact process for executing a vector t-shirt mockup and also give away 2 free vector t-shirt mockup files!

Happy June! Here in Atlanta, it definitely feels like summer has arrived, and by summer, I mean ridiculous amounts of sticky humidity. Outside of popsicles, which we’ve already created, I was brainstorming another symbol of summer that represents refreshment (instead of stickiness), and for whatever reason (I’m landlocked by a minimum of 4 hours and I’ve never surfed before), a surfboard came to mind. Not only do surfboards represent warmth, summer and refreshment, but they’re also a designer’s dream to work on (fun culture aspect + big canvas). So this week, we’re going to create some super easy, vector paint streaked surfboards in Illustrator using my newest design assets: paint streak textures, 2 of which I’m giving away for free! 

It’s that time of the year when there are a bunch of events to celebrate: graduations, weddings and anniversaries from weddings before. Confetti is obviously a must have, real and digital. 🙂 That’s why we’re creating our own digital custom confetti brush in Photoshop in this week’s video tutorial! We’ll create the shape of our confetti, adjust color at the slide of a knob, and even control how much it scatters in a few quick and easy steps. Prepare to start confetti-tizing all of your digital celebration themed work from here on out 🙂 Let’s get started!

Happy Tuesday! I thought I’d add a more advanced tutorial to the mix since we’ve really laid all the foundation in earlier tutorials. Plus, this one’s really fun and with just a few quick steps, you end up with a pretty cool outcome. In this week’s video, we’ll add vector dimension to typography by taking some hand lettering created with the Wacom tablet (like in this or this tutorial), and we’ll add vector gradients to simulate shadows to bring in that vector dimension. The end result is a 3d looking piece of your own typography, plus you can use the same technique for any kind of artwork, not just typography – think logos, patterns, icons and illustrations! Let’s get started!

Hope you’re having a great week! I had a rough start to mine, but it’s finally coming around – almost Friday! Anyway, today we’re talking about a sometimes confusing subject: photoshop layer masks. I realize it’s not the sexiest topic ever, but I can’t stress enough how important it is to understand and use them. I was actually so scared of layer masks that I went through my entire 4 year degree avoiding them. I cringe thinking about all the extra work I made for myself in my college days. I’m still not sure what sounded so scary about them, but I’m so glad I got over my layer mask-ophobia because I’ve been empowered to create and edit images and artwork quickly and non destructively in photoshop ever since. Here’s a quick, everything-you-need-to-know-to-avoid-confusion overview 🙂

Hope your weeks are going well and if they aren’t, tomorrow’s Friday! I have a little survey favor to ask if you can spare (literally) 10 seconds today (please don’t cringe!). Every week, I try to think of things I wish I would have known when I was first getting started or while I was fully established in my career. I want to make this site as helpful as possible for anyone feeling unsure, intimidated or just wanting to learn a little more about being in the field or designing new work. I’m playing around with the idea of creating a full course on a design topic so things can go a little deeper than a 15 minute vid. Obviously this would be a big time commitment, so I’d like to make sure I spend that time on a topic that will be the most useful to readers of this blog. So! My little survey is only one question (hence your 10 seconds) which you can answer by clicking the box of your choice below. Thanks so much in advance! Have a great rest of your week with the extra karma I’m sending your way 😉

Happy Tuesday! Hope you all had a great weekend! It was around 80*F all weekend just outside of Atlanta and perfect. Spence and I put new mulch around our home for the first time, added some solar lights to the walk up to the front door and sat on our patio each morning sipping delicious lattes from our recently purchased espresso machine. Wish we could do that every day 🙂

With it getting warmer out and summer noticeably on the way, I was thinking after completing the yard work this weekend that I could really go for a popsicle! I had a request not too long ago to add a few more cute illustration-type tutorials, so this week, a watercolor popsicle it is! We’ll create everything in Illustrator, then add in some pretty watercolor texture to finish it all off – a popsicle kind of is frozen watercolor if you think about it, so it totally works 🙂 Let’s get started!

Welcome to the third and last video in the video series, ‘How to Create a WordPress Website from Start to Finish‘! In this week’s final video, we’ll start by briefly walking through WordPress’s interface to get familiar with where everything is for editing purposes. Next, with the help of our friends at seoai.co.uk, we’ll find, install and activate plugins to improve our theme’s SEO, limit spam, offer downloadable content, and provide related posts at the end of every post to keep your readers engaged within your site. We’ll also walk through where to find your theme’s documentation to customize your specific theme even further. By the end of the tutorial, you’ll be up and running and feel confident knowing the little details in the background will be working for you with each new post you create. Let’s get started!

This is the second video in a 3 video series on how to create a WordPress website from start to finish. If you missed the first part on how to choose the right wordpress theme, check it out here! In this week’s tutorial we get technical – but we’re keeping it easy and understandable, going step by step without anything skipped over or left out. At the end of the video, you’ll have the confidence to start your own WordPress site with your own url using any wordpress theme you picked out to use. For this tutorial, we’ll be using bluehost to purchase our own domain and wordpress hosting which will get our website up and running for anyone to see. Let’s get started!

GDPR Icon

Your Privacy Matters

We use cookies to customize and create content that’s most important to you. We’ll never share the info we collect.

View Privacy Policy