HomePosts Tagged "lettering" (Page 6)

lettering Tag

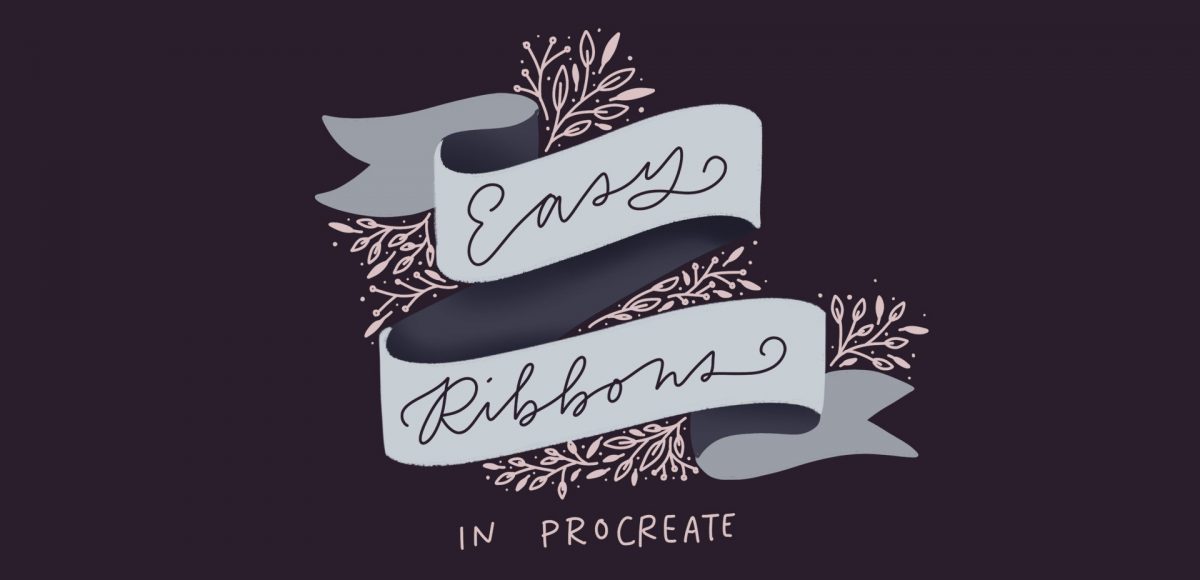
It’s the last Thursday in October, which means it’s time for your free November 2018 desktop wallpapers! This month’s wallpaper was entirely created in Procreate, with just the dates added in using Photoshop and my font, Miss Magnolia. I created the ribbon you see following the exact steps from this Procreate tutorial. All of the details, including the lettering were made with my custom monoweight procreate brush, which is available for free in the Every-Tuesday Resource Library. The texture shading was added using the default chalk brush in the calligraphy tab in Procreate. For the dates, ‘R’ is for Thursday, to distinguish it from a same-sized Tuesday ‘T’ at a glance. 

The download includes the November 2018 desktop wallpapers in two common resolutions: 1280x1024px and 1920x1080px, with and without dates. I’ve left the year off of the ‘no-dates’ versions, so you can use it for any November in the future, too!

Happy almost-Halloween! With all the fun crafts that Halloween inspires, I couldn’t let it pass without adding a DIY to the mix! It’s been a little while since we had a craft tutorial and this is my biggest one yet. This week, we’ll create some mixed media 3D Halloween lettering you can use as decoration anywhere! We’ll plan it out + paint it with watercolor, add details with fineliner pens AND add some sparkle to finish it off. I’ll take you through my process of painting 3D, pop-off-the-page lettering, as well as how I plan out flourishing to frame the final piece. Read on to create your own mixed media 3D Halloween lettering!

It’s the last Thursday in September, which means it’s time for your free October 2018 desktop wallpapers! This month’s wallpaper was entirely created in Procreate, with just the dates added in using Photoshop and my font, Miss Magnolia. It’s officially Fall! Since October is the spookiest month in the US, I had to add some cute webs to this month’s wallpaper 🙂 I used my custom monoweight procreate brush for the web details and base lettering, which is available for free in the Every-Tuesday Resource Library. The texture shading was added using the default chalk brush in the calligraphy tab in Procreate. For the dates, ‘R’ is for Thursday, to distinguish it from a same-sized Tuesday ‘T’ at a glance. 

The download includes the October 2018 desktop wallpapers in two common resolutions: 1280x1024px and 1920x1080px, with and without dates. I’ve left the year off of the ‘no-dates’ versions, so you can use it for any October in the future, too!

Many of you likely know I teach a comprehensive course on creating and selling hand lettered fonts (check it out here!). The course reopens next week for the last time this year, so if you plan to get started, I thought some lettering supply recommendations were in order!

There are 2 ways you can create your initial lettering for converting into a font: digitally or analog. If you choose the digital route, I recommend using Procreate on an iPad with pressure sensitivity since there are amazing brush options for different looks. This post is all about the analog, though – as much as I love the iPad, there’s still something about lettering supplies on paper (not to mention the much lower price point!). Read on for my favorite lettering supplies for font making, analog-style 😉

It’s the last Thursday in August, which means it’s time for your free September 2018 desktop wallpapers! This month’s wallpaper was entirely created in Procreate, with just the dates added in using Photoshop and my font, Miss Magnolia. Although summer is coming to an end, I can’t help but love the few fireflies we still see in our southern evenings, so this wallpaper is for them 🙂 I used my custom monoline procreate brush for the lettering and doodle details, which is available for free in the Every-Tuesday Resource Library. For the dates, ‘R’ is for Thursday, to distinguish it from a same-sized Tuesday ‘T’ at a glance. 

The download includes the September 2018 desktop wallpapers in two common resolutions: 1280x1024px and 1920x1080px, with and without dates. I’ve left the year off of the ‘no-dates’ versions, so you can use it for any September in the future, too!

Last year, I bought myself a big pack of Coliro Colors FineTec metallic watercolors for my birthday. I had experimented with their gold collection earlier and couldn’t wait to have more colors to play with. The rest of the year, I obsessed with using them on new lettering pieces, custom greeting cards for friends and family – anything I could think of. The way they glimmer in the sunlight is so beautiful, I was constantly looking for ways to create other shiny outcomes 🙂 I broke them out again the other day and realized I never shared my blending methods in a tutorial, so it was time for that to change! These watercolors get thick + dry pretty fast, so blending can be a little more complicated than traditional watercolors. In this week’s tutorial, I walk you through 3 blending effects using metallic watercolors with all of my favorite, long-tested tricks 😉 Read below for them all!

If you’re just getting started with Procreate – especially after all the recent updates – it’s totally normal to feel a bit overwhelmed! This week, I wanted to do a super simple Procreate tutorial for beginners that will also give you some great insight into the capabilities Procreate now has. In this tutorial, we’ll create 2 easy ribbons in Procreate and you’ll pick up some tips you can use for your future digital artwork, as well. Read on to get started!

If you love lettering – whether it’s on paper or an iPad, you’re probably familiar with how powerful your lettering becomes when it’s vectorized. Vectorization allows your lettering to be infinitely rescaled without losing quality. This means it can be put on anything, at any size and look as great as the day it was drawn. Since it’s a digital copy, it can exist for forever without fear of it being buried in past stacks of lettering experiments, too. It’s also a crucial step in creating open type fonts!

In this week’s video, I’m sharing my favorite, most reliable Illustrator trace settings when it comes to vectorizing lettering. These are the settings I use every time I vectorize to keep as much original quality as possible. Read on for it all!

One of my favorite discoveries of the past year is a product called BRUSHO. It’s essentially concentrated, powdered watercolor, and it’s awesome. It took me some time to find the best process for using it with my DIY artwork, so in this week’s tutorial, I’m sharing everything I’ve learned! Skip all the troubleshooting/wasted material I went through and let’s create a Father’s Day card using BRUSHO together!

With Mother’s Day right around the corner, this week, we’re DIY’ing a hand lettered watercolor Mother’s Day card! My mom’s birthday is actually on Mother’s Day this year, so I had to think of something extra special 🙂 Cue masking fluid, brush pens, a watercolor effect and some lettering enhancements! In this week’s video, I share my trick for protecting your paint brush with masking fluid, how I cut down watercolor paper for greeting cards, use brush pens to create a watercolor texture and use regular lettering supplies to add final details. Pick up all the supplies shown and catch the full video below!

You may have seen this style of lettering floating around instagram and created in Procreate on an iPad. In this week’s tutorial, I share how to create the same effect, but in Illustrator. By using Illustrator, everything can be infinitely rescaleable since it’s vector-based. We’ll utilize some features you may not be aware of that you can use for future work, too. This is a slightly advanced tutorial, so the pace is a bit quicker. If you’re new to Illustrator, allow some extra time (or check out some beginner tutorials first). Read on to create colorful gradient lettering in Adobe Illustrator!

GDPR Icon

Your Privacy Matters

We use cookies to customize and create content that’s most important to you. We’ll never share the info we collect.

View Privacy Policy