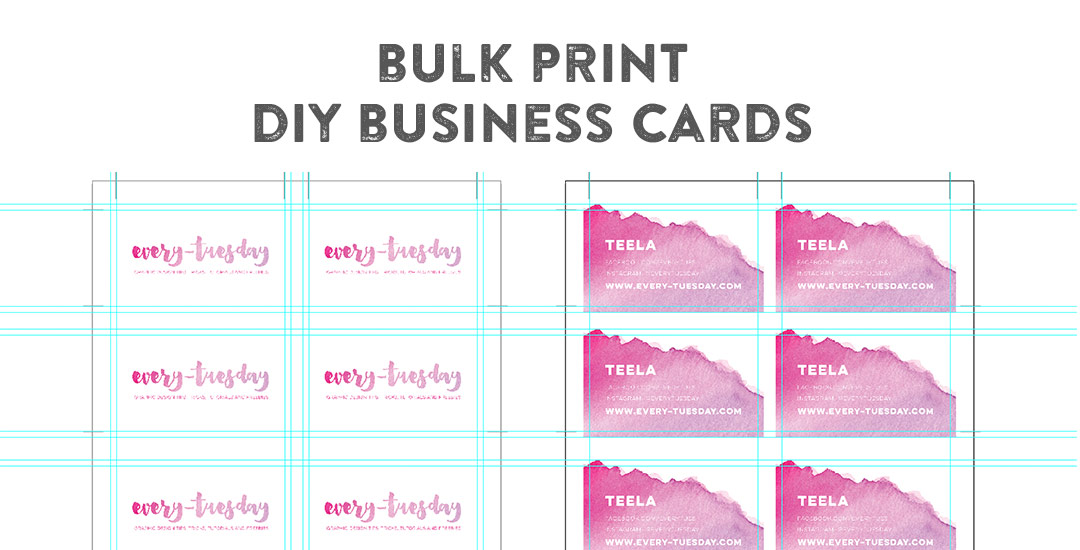
HomePosts Tagged "adobe" (Page 6)

adobe Tag

Happy Tuesday! This week’s tutorial comes courtesy of Jodie who asked a great DIY question I think will help a lot of people. Personal business card printing can get pricey pretty quickly if you’re looking for anything better than a paper thin glossy card (ick). I’ve DIY’d every personal business card I’ve ever made. Yup. And you know what? Even fancy shmancy design studios loved em. So say you’ve designed up a killer card design in Illustrator and don’t want to be wasteful with your paper. Say you also have a back of the card designed that you need to match up to the front when you print on your home printer. What’s the best way to make the most of your paper and have things work out perfectly front to back? In this week’s tutorial, I share how to bulk print DIY business cards using Illustrator to print 8 cards, front and back using one sheet of 8.5″x11″ paper. You can also use the same method in InDesign if you’d prefer using that instead. Let’s go!

Happy Tuesday! This week’s tutorial is brought to you by Whitney + Monica who both emailed asking how to vectorize hand drawn doodles so they would have reuseable, and infinitely rescalable vectors. You’ve probably seen vector artwork around a lot lately – I just released a pack of vectors a few weeks ago and gave 5 of them away for free. In this tutorial, using that vector pack as an example, I share how I took those hand drawn elements from a doodle on a sheet of copy paper to a crisp vector that can be used over and over again on any application. Do you remember the how to vectorize hand lettering tutorial? If you’ve practiced that at all, you’ll be in great shape with converting doodles 🙂 In this video, we’ll go over 3 different methods of cleaning up your doodles, so whether you’re a beginner or advanced Illustrator user, there’s an option that will work for you. Let’s get started!

If you took my Watercolor Branding Skillshare class, you learned how to digitize watercolor textures – from scanning them in, to color adjustments, to removing the background correctly so they could be placed on anything. When a watercolor texture is scanned in, you’re limited by the greatest size and resolution your scanner is able to scan at. For large applications (think billboards, signage, posters), if a professional scanner wasn’t used, resolution is likely too small for the texture to reproduce as crisply as you might wish. Enter vectorized textures. Since vectors (which are point based instead of pixel based) can be rescaled infinitely without losing quality, they make a great alternative to finding a high res scanner and going through the process of color editing + removing the background again. Watercolor textures are super detailed, so finding a happy medium with file size and a similar outcome to the raster (pixel) based image is key when vectorizing. In this tutorial, I share my exact method on how to vectorize watercolor textures using two different textures. We’ll go over what to look for when you vectorize your own.

We may not be fashion designers, but that doesn’t mean there isn’t a place for graphic designers with apparel design. At some point in time, the majority of graphic designers have to mock up some kind of apparel to get quoted and executed by a manufacturer. It’s no surprise why – as branding experts, we need to be able to carry a brand through a variety of applications, and especially at events, apparel is key.

I’m currently working on some clothing designs for a company that will be at the 2016 Rio Summer Olympics. They’re in the process of finding a manufacturer for their clothing and had asked for mockups to present to potential manufacturers to get accurate quotes. They sent a few pictures of styles of clothing they were interested in, all at different sizes and resolutions. To keep the focus on the design of the clothing and keep everything similar, I redrew the clothing in Illustrator, then implemented the vector graphics on top.  Having redrawn it in illustrator, all the clothing was kept consistent look-wise and the manufacturers were quickly able to see which panels would be printed with design or kept the base color. In this week’s tutorial, I’ll share my exact process for executing a vector t-shirt mockup and also give away 2 free vector t-shirt mockup files!

It’s that time of the year when there are a bunch of events to celebrate: graduations, weddings and anniversaries from weddings before. Confetti is obviously a must have, real and digital. 🙂 That’s why we’re creating our own digital custom confetti brush in Photoshop in this week’s video tutorial! We’ll create the shape of our confetti, adjust color at the slide of a knob, and even control how much it scatters in a few quick and easy steps. Prepare to start confetti-tizing all of your digital celebration themed work from here on out 🙂 Let’s get started!

Happy Tuesday! I thought I’d add a more advanced tutorial to the mix since we’ve really laid all the foundation in earlier tutorials. Plus, this one’s really fun and with just a few quick steps, you end up with a pretty cool outcome. In this week’s video, we’ll add vector dimension to typography by taking some hand lettering created with the Wacom tablet (like in this or this tutorial), and we’ll add vector gradients to simulate shadows to bring in that vector dimension. The end result is a 3d looking piece of your own typography, plus you can use the same technique for any kind of artwork, not just typography – think logos, patterns, icons and illustrations! Let’s get started!

Happy Tuesday! Hope you all had a great weekend! It was around 80*F all weekend just outside of Atlanta and perfect. Spence and I put new mulch around our home for the first time, added some solar lights to the walk up to the front door and sat on our patio each morning sipping delicious lattes from our recently purchased espresso machine. Wish we could do that every day 🙂

With it getting warmer out and summer noticeably on the way, I was thinking after completing the yard work this weekend that I could really go for a popsicle! I had a request not too long ago to add a few more cute illustration-type tutorials, so this week, a watercolor popsicle it is! We’ll create everything in Illustrator, then add in some pretty watercolor texture to finish it all off – a popsicle kind of is frozen watercolor if you think about it, so it totally works 🙂 Let’s get started!

Happy Tuesday! This past weekend was reallllly busy for me! I designed our wedding invitations and recorded a Skillshare class on the entire process from start to finish: all of the research, sketches, lettering experiments, then finally setting up and saving the file correctly so it’s ready to hand off to my letterpress printer. You can watch the free intro to the class (called Laying out Your Lettering for Letterpress) here and just for my blog readers and YouTube watchers, I’m sharing one the other videos today. This video covers the sketching process of lettering based on research which determined the look and feel we were going for (Southern rustic). If you’re interested in seeing the rest of the class, you can sign up for Skillshare free of charge for an entire month using this sign up link.

Happy Tuesday! I’ve had a few requests for more lettering tutorials, so I’m here to deliver! I’ve also made a lettering playlist which you can check out here where I’ll keep them all together 🙂

In this week’s quick tip video tutorial, we’ll digitally letter the number 3 two ways. For the first way, we’ll be using this Wacom tablet (or any of these) and the brush tool in Illustrator. After that, we’ll digitally letter the same number 3 from scratch using just the pen tool. We’ll go over the best way to plot your points and basic point handle adjustments using the direct select tool in Illustrator. Let’s get started!

GDPR Icon

Your Privacy Matters

We use cookies to customize and create content that’s most important to you. We’ll never share the info we collect.

View Privacy Policy