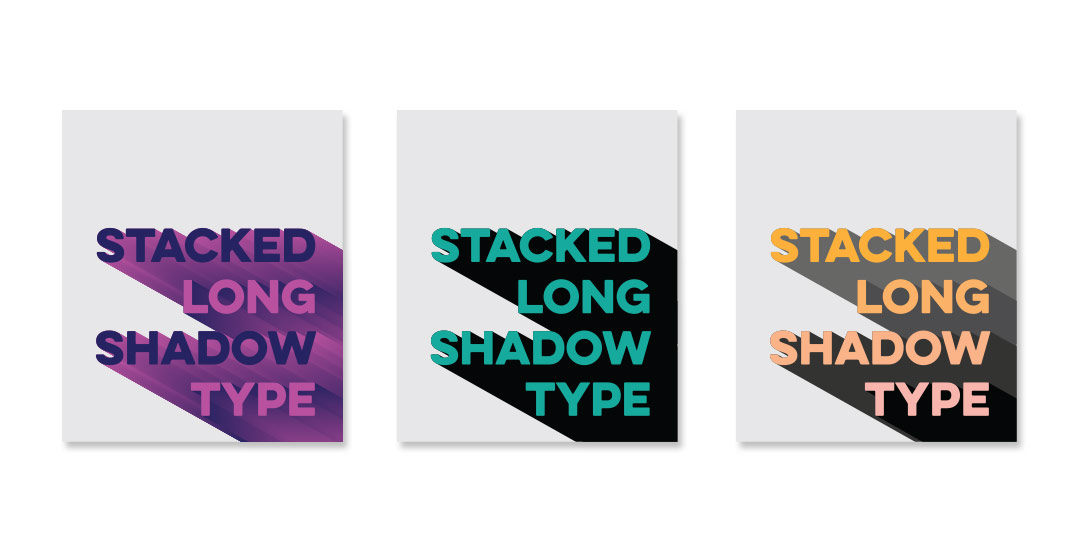
HomePosts Tagged "illustrator" (Page 6)

illustrator Tag

Happy Tuesday! This week’s tutorial comes courtesy of Brittany, who shared this photo with me, which I agreed would make a great quick tip tutorial! As a bonus, I’m sharing how to create multi-colored long shadow typography, in case you’d like to use more than one color for your shadows 🙂 We’ll create every version quickly in Illustrator using one simple tool and a couple of extra time saving options. This is perfect for gig posters, MTV-esque retro designs, greeting cards, or paired with simple icons. Read on to see it all!

One of my favorite things is taking a doodle and reimagining it digitally. If you’ve been here before, you know that’s true! One thing I find myself doing a lot with my mini doodles lately is turning them into seamless pattern brushes so they can connect to make (any length) dividers, laurels – you name it. There’s a little trick to getting them seamless and once you do, they are so much fun to play with. In this week’s tutorial, we’ll take a mini doodle, vectorize it, make it seamless, then convert it into a multi-purpose, seamless pattern brush in Illustrator. Read on to see how easy it is!

Happy Tuesday! A few months ago, I shared how to create a confetti brush in Photoshop and I’ve gotten a few requests since then on how to do the same in Illustrator. It’s a slightly different process, but can absolutely be done! In this week’s quick tip tutorial, I share how to create a confetti brush in Illustrator using two different examples: uniformly sized circular confetti and randomly scaled and rotated star confetti. This time of year, when real confetti is imminent, now you’ll have limitless digital confetti potential, too! Read on to see how!

Happy December! I’m not sure how we got here so quickly, but here we are! In the spirit of the upcoming holidays, I’m excited to say the next few weeks will all be holiday-specific tutorials. This week we’re going to start things off with a typography tutorial (my favorite kind) requested by Allison on how to form typography into a shape. To start the holiday theme off, I’ll share how I would create typography to conform to the shape of a holiday bulb using the word ‘Joyful’. Read on to see it all!

Today is a big Tuesday! I just went live with my newest kit, Glitz + Glam, Digital Hot Foil and Glitter Textures, AND I’m giving one of those textures away for free in this post! I’ve gotten a few questions on how I apply gold textures to some of my Instagram images, so with the release of the kit, the free texture, and the holidays coming up, I wanted to share how to create hot foil typography using Photoshop and Illustrator this week. This week’s freebie comes as a seamless pattern file, high res tileable jpg and layer style. Read on for the freebie, tutorial, and more info on the kit!

Happy Tuesday! As we approach Thanksgiving month, I thought Katherine’s request for a tutorial on feathers in Illustrator was a great idea this week. Since no style was specified in her request, I decided to share how to replicate two styles I love – organic and geometric/iconic. We’ll go over a bunch of quick tips, like easily altering paths, applying clipping masks, expanding strokes and utilizing the pathfinder palette. At the end of this tutorial, you’ll have an organic and geometric/iconic style feather you’ll be able to apply any color or texture to, alter easily, and implement to any application in both CMYK and RGB. Read on to see how!

Today is an especially happy Thursday, because 2 years ago today was the very first Every-Tuesday post! I can’t believe how much has changed in that time and I couldn’t be happier delivering new design goodies and tutorials here every week. Speaking of design goodies – it wouldn’t be a proper birthday without a few design gifts! To celebrate 2 years, this week’s freebie is a set of birthday vectors as an ai, eps and psd for versions of Illustrator and Photoshop, CS3 or newer. See the full preview below!

Spence doodled out this adorable Frankenstein the other day and I just had to bring it to life in Illustrator! Since flat illustrations/icons are still very popular these days, I decided to draw it out in a flat illustration style with a half face shade and a long shadow. This would work great on a party invite, perched atop toothpicks on Halloween themed cupcakes, printed out life sized on a front door, or tied around candy goodie bags. This same style could be adapted for a ghost, witch, pumpkin and/or skeleton to create a full set. Video tutorial below along with the template sketch used in the tutorial!

This week’s freebie is a set of 10 hand drawn vector spider webs to add a little more creepy crawly to your Halloween designs this year. 😉 Set includes corner webs and full spider webs to make positioning, cropping and usage a piece of cake. A bonus couple of dangling spider vectors also included for good measure. 🙂 All vector elements are included as an ai, eps and psd file for versions of Illustrator and Photoshop, CS3 or newer!

After the tutorial How to Repeat Any Shape Along a Circular Path, I had a few questions on how to repeat shapes along any path, not necessarily a circle. In this week’s tutorial, I share a quick tip that will make repeating shapes along any path a cinch in Illustrator. In this video, we’ll utilize the shape tool and blend tool to create repeats perfect for borders, dividers or accents for your designs. We’ll go over repeating a single shape style and expand into a shape transition with a color blend for more complex results using the same technique. Read on to see how!

Happy Tuesday! First of all, I have to tell you that I’ve been completely overwhelmed by all of the kind comments from last Friday’s post. My heart is bursting with gratitude. Thank you so very much for making this past weekend one I’ll never forget!

My co-workers gifted Spencer and I this amazing typography book as a going away gift last week and I have a serious problem with putting it down! There’s something that completely pulls you in when you lay eyes on the shadow type in the book – each layer so carefully planned, highlights and shadows in perfect contrast with one another along each angle and curve. Handmade type back in the day was so killer. I’m jealous of those craftsmen and craftswomen type masterminds. Of course, I couldn’t help myself with creating my own, digital form, inspired by pages from the book. In this week’s tutorial, we’ll create our own multi-layered 3D typography from scratch in Illustrator. In part 2 next week, we’ll bring that typography into Photoshop to add texture and enhance highlights + shadows to complete our type. Let’s gets started!

Keeping with the brush/india ink theme this week, this week’s freebie is a pack of 20 vector brush textures! Add quick texture to portions of your artwork or use as dividers. To add a faux screenprinted edge effect quickly, apply a brush texture to each side of a color filled rectangle. All textures are 100% vector and can be used with any version of Illustrator or Photoshop, CS3 or newer. Preview below; ai, eps + psd included in the download!

GDPR Icon

Your Privacy Matters

We use cookies to customize and create content that’s most important to you. We’ll never share the info we collect.

View Privacy Policy