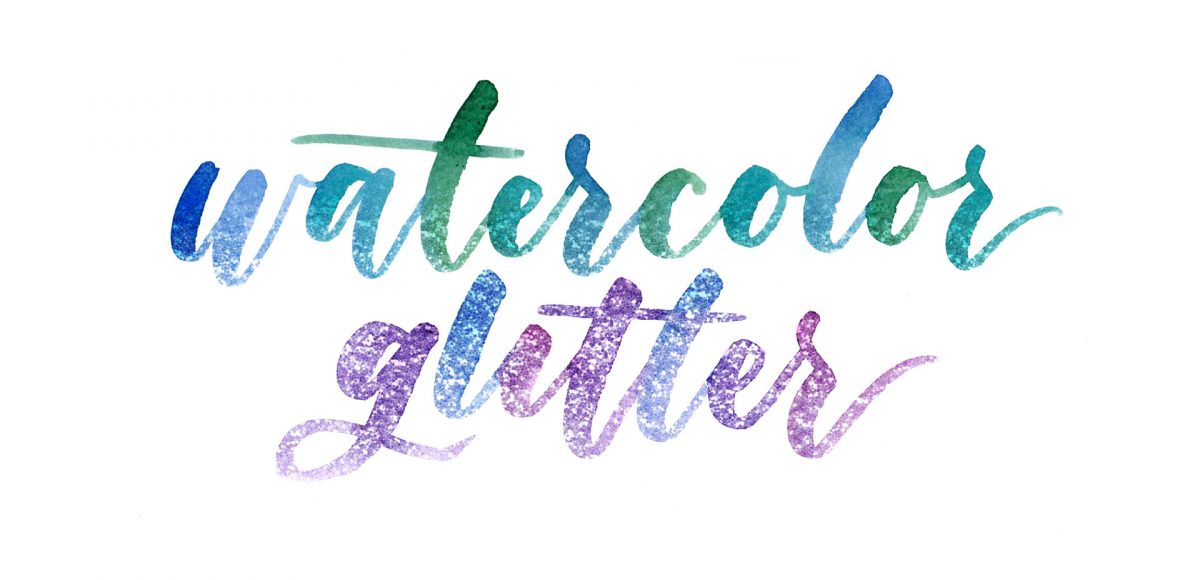
HomePosts Tagged "diy" (Page 7)

diy Tag

I actually stumbled upon this effect while playing around in Photoshop with this Instagram post awhile back. It felt like it needed a little something extra, and after playing around with some settings, I was able to get a watercolor glitter effect I really loved. I had completely forgotten about it, then that instagram post randomly appeared in my pinterest feed the other day. That’s when I knew I had to create a tutorial 🙂 If you’re not ready to use your own watercolor lettering yet, I’ve included another option for achieving the same effect using your favorite fonts. Read on to see it all!

Happy Tuesday! This part of the year is always one of my favorites because it’s all about celebrating moms. My mom and I have always been really close – she was actually born on Mother’s Day the year she was born, and when she had my youngest sister, it was Mother’s Day that year *and* her birthday. Pretty crazy, especially since Mother’s Day doesn’t land on the same day each year. In case life has gotten a little crazy lately and you haven’t picked up a card yet, I’ve got you covered 😉 This week, we’ll create a simple (beginner friendly!) watercolor florals Mother’s Day card in Illustrator using a bouquet from my newest Watercolor Leaves and Florals kit, or you can use the free mini kit I’ve also included below. Read on to see it all!

Happy Tuesday! This week, I’m excited to revisit the world of watercolor lettering – one of my favorites, for sure 🙂 When Spence and I left our previous jobs, our coworkers gifted us the book, Shadow Type, by Steven Heller and Louise Fili. The binding is already breaking on it, from obsessing over the perfectly executed lettering from back in the day. It’s high on my list of type books, without a doubt. Anyway! As I was looking through it the other day, one of the images caught my attention and I wanted to try it with watercolor. I practiced it over and over until I had a process I was happy with. This week I’m sharing that process – of how to create a debossed watercolor lettering effect.

I secretly love creating tutorials that appear more difficult than they actually are. This week’s tutorial is exactly that, but also perfect for beginners with a really cool outcome. In this tutorial, we intertwine text and vector elements to draw attention to our messaging and make it visually striking at the same time. Read on for all the details!

Happy Tuesday! I’m not gonna lie, this week’s tutorial is one of my favorites. Essentially, we’re combining the watercolor photoshop brush tutorial from a few weeks ago with last week’s ribbon tutorial. And we’re doing it all in Illustrator and keeping things simple and easy 😉 We’ll start by taking some watercolor textures on transparent backgrounds (like these, these or these), and then directly convert them into watercolor texture brushes in Illustrator. You’ll be able to transform the textures into any shape using the brush tool to create beautiful results. Create them once, then save them out for infinite future uses, too! Read on to see how!

If you’re just diving into Illustrator, this week’s tutorial is perfect for beginners! We’ll go over some very basic, but powerful tools that you can use in different ways well into the future. In this tutorial, we create a simple ribbon brush together (from scratch) using Adobe Illustrator. We’ll talk about different brush settings, customizing your ribbon before and afterwards, and even how to save it for future use. Everything you need to get started is below!

Happy Tuesday! These Tuesdays are my favorite because I get to share a class I love and send it out into the world. Today’s class, Fantastic Flourishes, is no different. Being the obsessed-with-lettering kind of person I am, flourishes have a big place in my heart. If you’ve ever wanted to draw better flourishes, integrate them into letters or create hand lettered layouts with beautiful flourishing, this class was made for you. The class is packed with helpful guides, practice sheets, cheat sheets and more. Get all the details and see the full class trailer below!

Happy December! Now that the holiday season is in full swing, I wanted to offer up a fun hand lettering technique for your (any time of the year) stationery, too! This ombre embossing effect is SO eye catching *and* I have a technique that avoids mixing your embossing powders together. Using this technique, you’re able to maximize the life of your powder purchases and create beautiful outcomes, too. Plus, look at the colors on black! I love the vibrancy and contrast embossing straight onto black produces. Swoon. Read on to see it all!

Today is one of the biggest days to date on Every-Tuesday. Our very first long-form, self hosted course (only available on every-tuesday) is officially open today, titled Brush Lettering with Watercolor!

Two years ago, I decided to go all-in with my brush lettering. I tried (what felt like) every supply out there, watched demos, looked at inspiration, read books, you name it. My lettering was improving very slowly, and I experienced a lot of frustration. A lot of overwhelm. A lot of second guessing. It felt like I was doing everything right, but my outcomes just didn’t feel like they were quite there. I started implementing a few new techniques and that’s when things really took a turn for me. I remember the night it finally came together so well, like I had cracked a special code.

On Tuesday, we created extra unique watercolor textures using 3 simple and creative tricks. There’s something about the way colors blend together with water that’s kind of magical. One of my favorite indulgences is searching out abstract, beautifully colored textures and seeing how I can put my own spin on them. To keep those eye candy textures better organized, I’ve even started this pinterest board, too. In a follow up to Tuesday’s tutorial, I wanted to share 8 inspiring watercolor textures to light that extra spark if you needed a creative boost today 😉 I know there’s never a bad day to feast my eyes on these!

If you’ve been here for any length of time, then you know I  have a slight obsession with watercolor. Part of it is mixing beautiful color combinations together, and another is creating abstract and unique textures. Creating unique textures allows you to then use them in designs, producing an outcome no other person is capable of replicating – ever. And that makes everything even more special. As you might imagine, I’ve spent many hours experimenting with watercolors and this week I want to let you in on 3 simple tricks to create unique watercolor textures of your own. It doesn’t matter which kind of watercolors you have on hand, either – these tricks will work with em all 😉

If you’re an Every-Tuesday subscriber, then you already received this brush lettering with watercolor supply list in your inboxes yesterday 🙂 It’s too useful of a resource not to share, so I wanted to also bring it into the blog this week. Having the right supplies can be a serious road block when you’re just getting started, and a costly one at that. After going through my fair share of supply testing (and cash), I’ve compiled a list of my absolute favorites. For those on a budget, or if you’re not sure if this is for you, I’ve also included a separate list of comparable, lower priced items 😉 My newest master course, Brush Lettering with Watercolor is now open if you’d like to put these supplies to use!

GDPR Icon

Your Privacy Matters

We use cookies to customize and create content that’s most important to you. We’ll never share the info we collect.

View Privacy Policy